


Quick, easy projects for gifting or selling craft fair markets are all the rage now! I'm here to add another one to my growing list of mini doll crochet patterns because this little guy's tiny and takes only about 30 minutes to whip up! You'll love this instant-gratification project. I won't be surprised to see an army of Pocket Dragons in the future!
Links
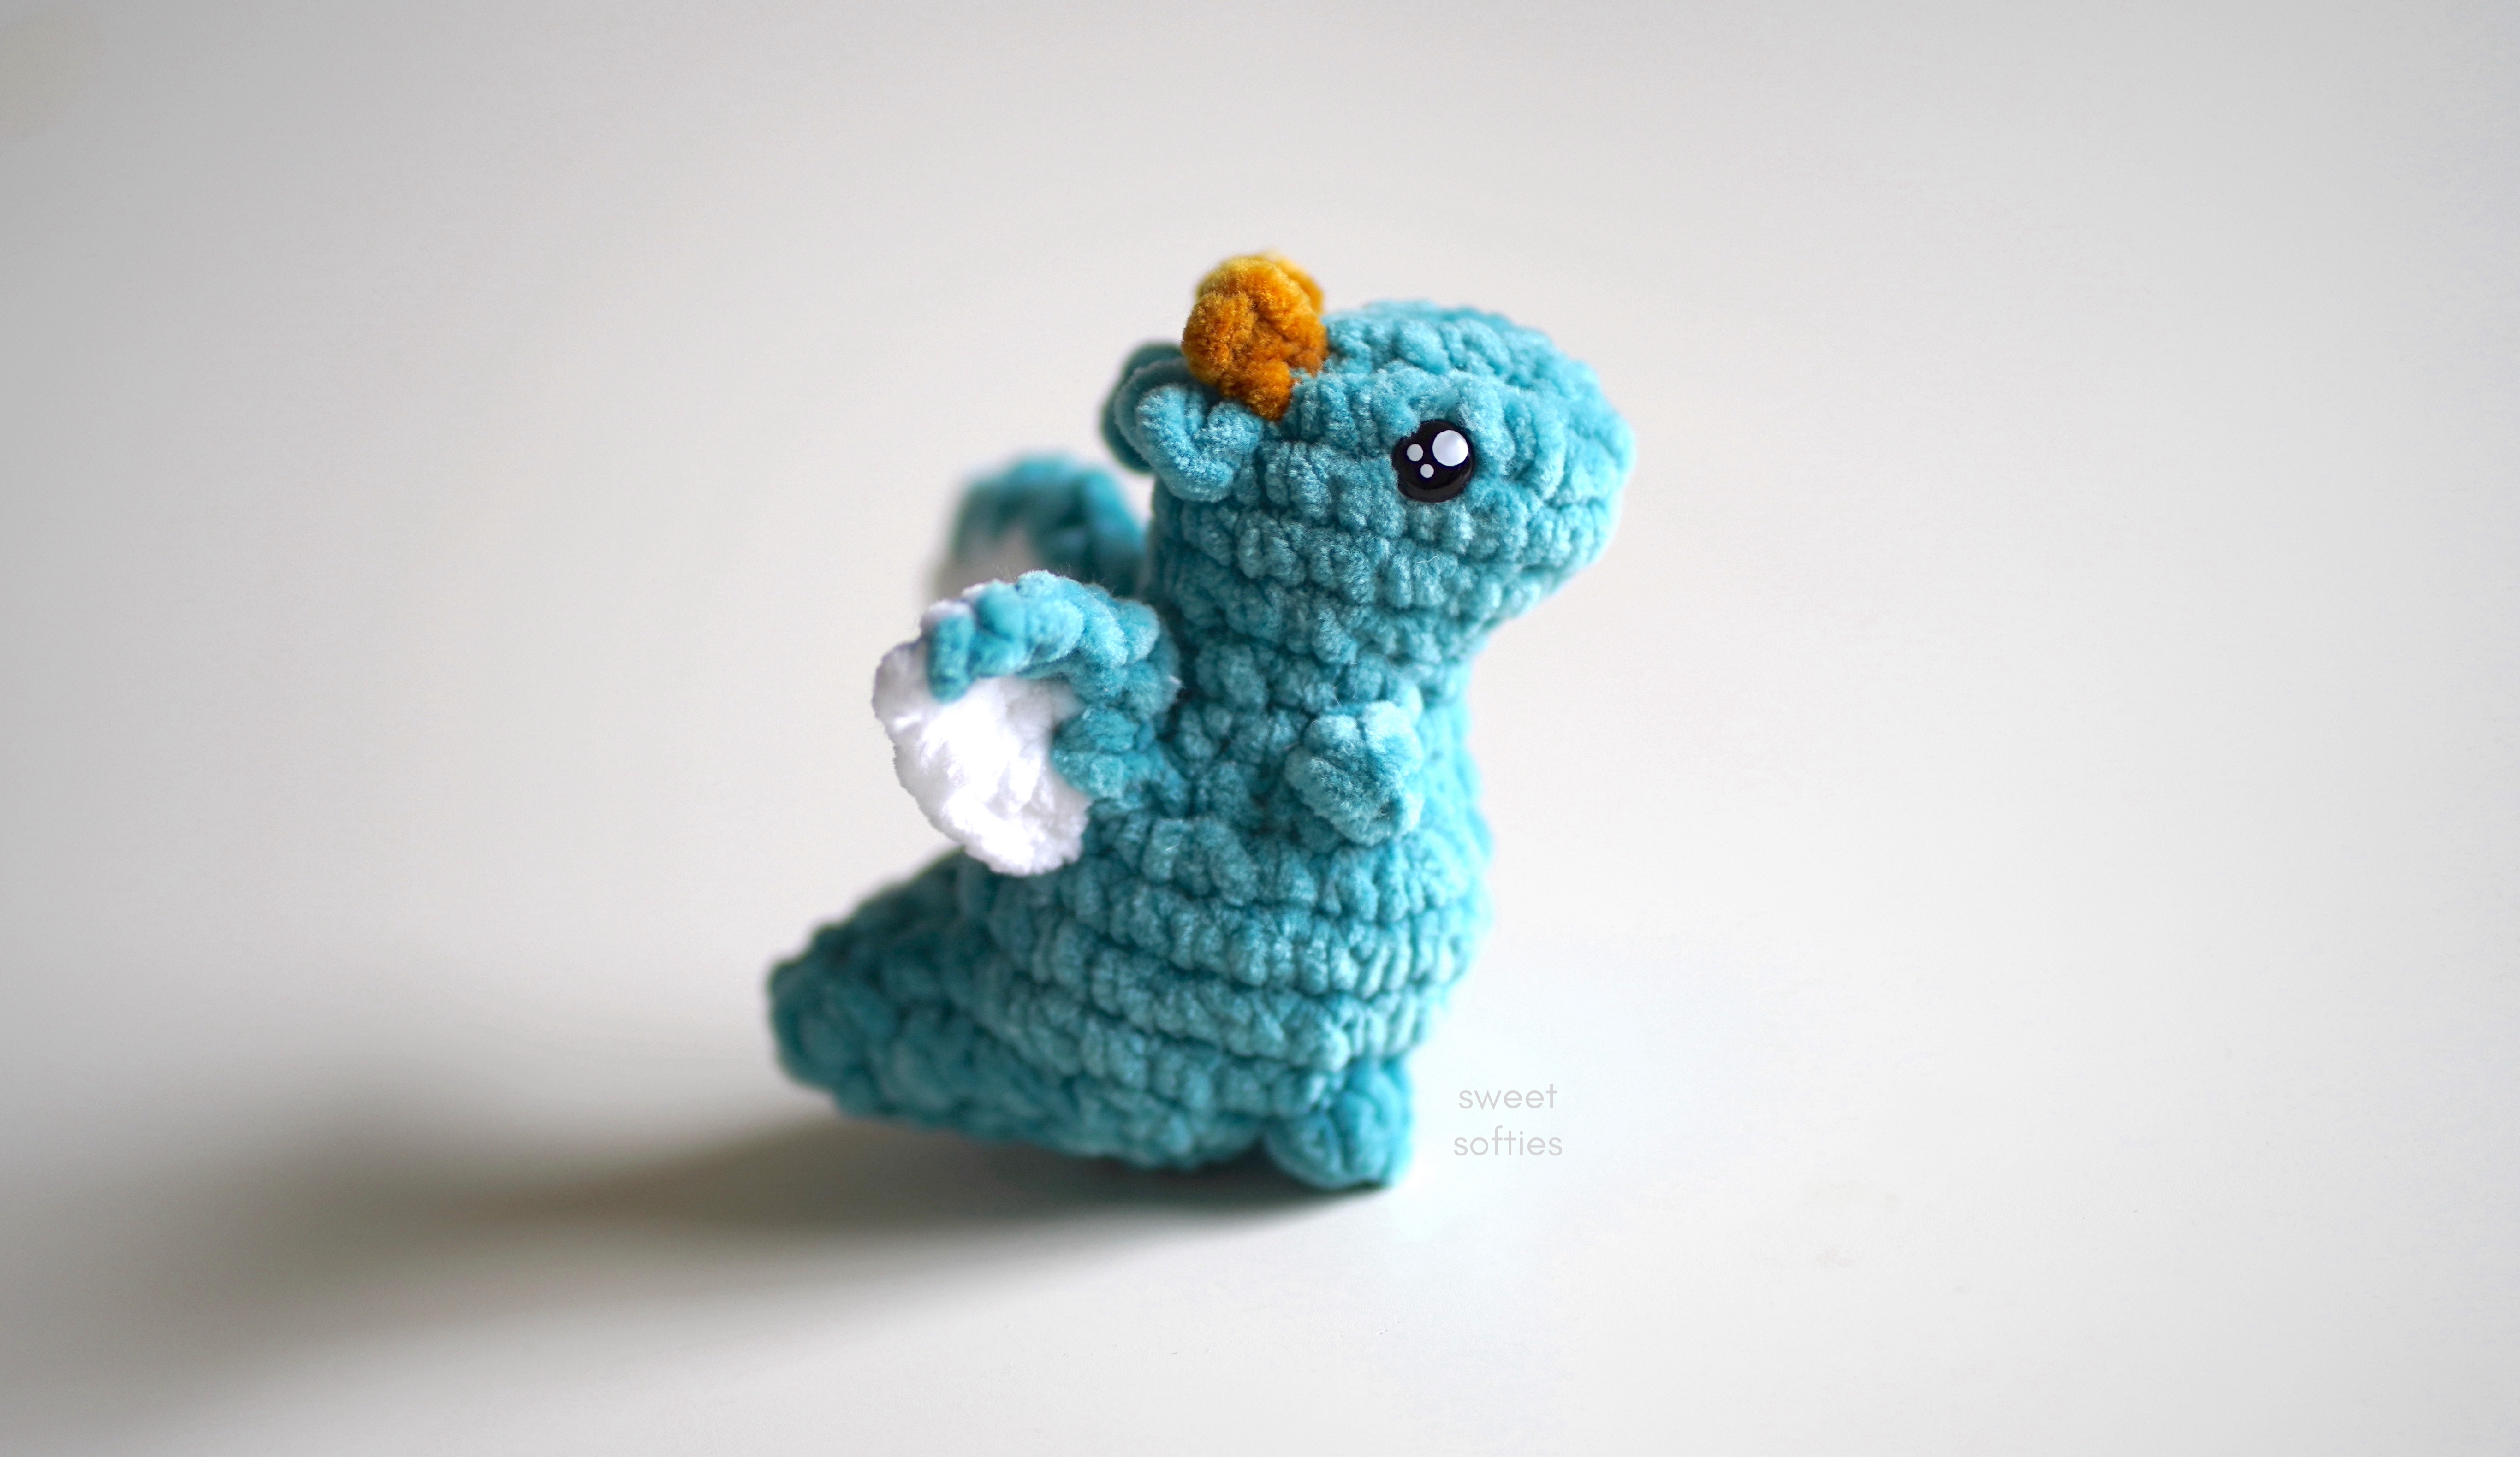
This Pocket Dragon is a cute, mini plush of magic and joy! This little fantasy creature is a quick, easy, and almost no-sew amigurumi. The only part that requires sewing is his wings. A full video tutorial is included, making this an easy and beginner-friendly project.
As you can see, he has a tiny set of wings and stubby limbs, along with a chubby body. I'm not sure how he actually flies or gets around, but...I've heard teleportation is a possible skill that dragons wield. Especially if they're THIS cute, because their humans will probably be more than happy to pick them up and plop them wherever they want to be!

Construction
Pocket Dragon is worked from top-down, starting at the top of the head to the bottom. You'll then crochet the arms, legs, and horns directly to the dragon without any sewing needed. The wings are made separately to be attached later, making it the ONLY part that requires sewing. If you do need help with the tiny bit of sewing that's needed for this project, you can check out my post on tips for sewing amigurumi pieces together.
How can they be used?
This squishy plushie can also be used for therapy as a sensory fidget or stress relief object. Its arms and legs are stumpy nubs that you can rub or twiddle with, providing tactile stimulation. This pocket sized plush makes a great friend, especially for people with anxiety, ADHD/ADD, or autism. Tiny-Rex makes a great friend!
Makes a great unisex gift & craft fair product!
It's the perfect ami plush to make for craft fairs, medieval or Renaissance fairs, farmer's markets, or as kids party favors. This unisex and gender-neutral toy will appeal to all: boys, girls, children, adults, and everyone in-between! I think it's a great last-minute birthday gift and Christmas holiday gift.
Pictured here is Pocket Dragon and Tiny-Rex sharing a nice moment!

How can you customize them?
Size: The recommended yarn for this pattern is a super bulky weight velvet yarn with a 5mm hook, which results in a 3.5" tall dragon. If you want to go even bigger, you can do so by holding super bulky weight yarn doubled with an even larger hook! To make a tinier keychain size (approximately 2" in height), you can use worsted weight and a 2.75mm hook.
Below is an example of a small Tiny-Rex made with medium weight yarn, which has the same head and body pattern as the Pocket Dragon.

Texture: You can use any yarn fiber, from cotton to chenille velvet, to create different textures. Cotton, acrylic, and wool yarn generally have better stitch definition, so you would see your stitches more clearly. However, if you use blanket yarn or velvet yarn, the stitches will appear less visible and the end result will look more like a plush toy!
Color: This project looks great in all different yarn colors, including solids, ombre, self-striping, and variegated yarn. To make stripes, you can alternate yarn colors as you work on the rounds from top to bottom. You can even hold two different yarn colors together as you crochet your dragon to create a multi-colored effect!
Extras: Customization is easy by adding crocheted appliques, bows, beads, buttons, eyes/facial features, and more.
For those of you who want to use these sparkly, cartoon (or anime) inspired eyes, you can get them on Amazon here:
Yarn used
To make your dragon exactly like mine, try going with some soft chunky yarn and a large (5mm) hook. The exact yarn I used is Hobbii's Baby Snuggle Yarn, perfect for a soft and cuddly toy. I'm a big fan of this yarn after having worked with a variety of similar yarns from different brands, and can safely say that it's my new favorite yarn for amigurumi. If you'd like, check out my Baby Snuggle Yarn Review for more information!
If you don't have this same yarn, I would say that a good substitute would be blanket yarn, polyester, chenille, or velvet yarn. These fibers would all have similar "plush" looks to them.
Of course, you can also use "regular" worsted weight yarn (paired with a 2.75mm hook) as well, to create a small baby for your Pocket Dragon. They would make fantastic keychains!

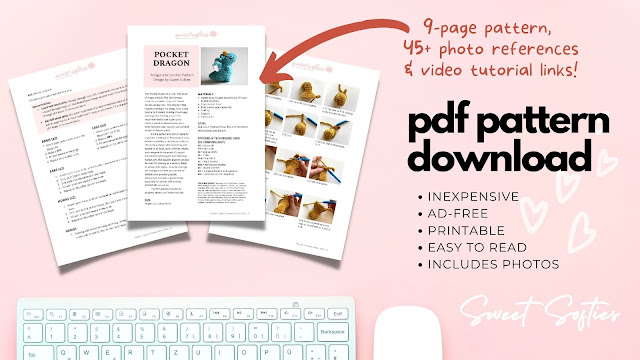
PDF Pattern
The PDF pattern is printable, ad-free, easy to read, includes photo references, and helps support Sweet Softies! (If you enjoy my free patterns, you can consider it as a donation to me when you buy one of my pattern PDFs! It allows me to maintain my blog and continue sharing more free patterns.)
Bonus: The Pocket Dragon pattern includes over 45 exclusive, step-by-step photo references to guide you through the crochet process.
POCKET DRAGON
Free Crochet Pattern
Terms of Use & Copyright Notice © 2022 Sweet Softies (www.sweetsofties.com). You have permission to sell finished products made from this pattern, but you must credit Sweet Softies as the owner/creator of this pattern by linking to my website (www.sweetsofties.com). No wholesale. You may not translate, copy, alter, or sell my patterns in part or in whole in any way. My patterns may not be used in video tutorials or teaching online classes. My patterns may be used in teaching in-person classes ONLY with written consent from me. You may link to this pattern but you may not copy any part of the pattern instructions on other websites.
Crochet Pattern Information
Size:
Height: 3.5 inches (9 cm)Level of Difficulty:
★★☆☆☆ Beginner/Easy. Requires familiarity with stitches used (below).
Stitches/Terms Used:
- FO = fasten off
- YO = yarn over
- sk = skip (a stitch)
- ch = chain
- sl st = slip stitch
- sc = single crochet
- hdc = half double crochet
- dc = double crochet
- inc = increase (insert 2 sc in same st)
- dec = decrease (sc 2 sts together)
Materials:
- Hobbii Baby Snuggle Yarn (super bulky “6”) in desired colors
- 5mm crochet hook
- 8mm plastic safety eyes (x2)
- Stuffing
- Scissors
Crochet Instructions
Notes:
- The head/body, arms, and legs are the same as Tiny-Rex. Here is Tiny-Rex's free written pattern and the video tutorial.
- The pattern for the ears, horns, and wings for the dragon are below.
EARS (x2)
- Attach yarn in a st in R3, at the location you want to create the ear.
- Ch 2, sc in 2nd ch from hook.
- Sl st back into the same st in the head.
- FO with a tail and weave in the ends.
- Repeat on the other side of the head.
HORNS (x2)
- Attach yarn in a st in R2 of the head, at the location you want to create the horn.
- Ch 2, sl st in 2nd ch from hook. Sls t back into the same st in the head.
- FO with a tail and weave in the ends.
- Repeat on the other side of the head.
WINGS (x2)
- Starting with the inner-wing color (e.g., white), ch 5. Hdc in 2nd ch from hook. Insert 2 dc in next st. Hdc in next. Sc in next.
- Switch to main body color yarn (e.g., turquoise), then sl st in the same st as the sc. Turn the piece. Sk the sl st. Sc 2, inc 2, sc.
- FO with a long tail and sew the wing to the body, around R7-R8.
- Repeat these steps for the second wing to finish this project!
Happy crocheting!

Video Tutorial
Ready to crochet along with me? Let's make Pocket Dragon together!
Thank you for reading, and hope you had a fun time crocheting this project! If you'd like to help out my blog, feel free to check out my post, "5 Ways to Support my Blog!"
You might like my other designs if you enjoyed this one! Simply click on the image below for the pattern, or check out all my free patterns here.


I'd love to see your finished work from my designs! Here are links for sharing photos of your creations:
Best wishes,

.jpg)


Great blog ! I am impressed with suggestions of author.
ReplyDeleteCross Body Bag Straps