Dear fellow crocheters,
I'm thrilled to share with you my Fall Harvest Pumpkin, a quick and easy crochet project that is perfect for adding a touch of Autumn to your home!
I have two pumpkin sizes on my blog: large and small!
All you need to know to crochet this pattern are super basic, beginner crochet stitches and sewing skills! This large, yellow pumpkin is actually crocheted with yarn held doubled, making it work up very quickly. You'll be working flat, turning your piece, and crocheting in back loops only. A combination like that results in beautiful ribbing, as you can see...
Want more Halloween patterns?
Click here for my free Halloween pattern roundup!
What's also awesome is that I've put together a video tutorial for the small pumpkin. If you prefer following along with my video instructions, check it out below! (Note: The big pumpkin's body is crocheted the same way, so if you're struggling with the written instructions, you'll likely find this video to be helpful too!)
This crochet pumpkin makes great decor during this time of the year, for holidays like Halloween and Thanksgiving. They're so fun and easy to make that you can easily crochet a collection of them in various sizes and colors! Imagine how wonderful they'd all look together!
Oh, and just for funsies... I decided to get a picture of this pumpkin with my other "pumpkin." Lena looks quite chipper to be with this big, squishy thing, doesn't she?
Come to think of it, this crocheted pumpkin would make such a great photo prop for Autumn and Fall themed photoshoots! Now I'd REALLY like to make a stack of these and surround Lena with them!
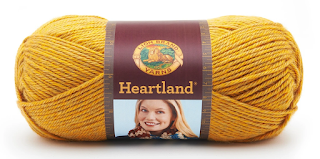
The yarn that I used for this project is the beautiful, Lion Brand Heartland in "Yellowstone". I just love its heathered, tweedy shade, and mustard yellow is one of my obsessions!
If you like this design of mine, you can check out the other free patterns I have on my blog!
(Includes detailed step-by-step photo references for both the small and large pumpkins!)

FALL HARVEST PUMPKIN
Free Crochet Pattern
Copyright Notice -- © 2020 Sweet Softies (www.sweetsofties.com). You have permission to sell finished products made from this pattern, but you must credit Sweet Softies as the owner/creator of this pattern by linking to my website (www.sweetsofties.com) or Facebook page (www.facebook.com/SweetSofties). No wholesale. You may not copy, alter, or sell my patterns in part or in whole in any way. My patterns may not be used in teaching online classes. My patterns may be used in teaching in-person classes ONLY with written consent from me. You may link to this pattern but you may not copy any part of the pattern instructions on other websites.
Introduction:
 The Fall Harvest Pumpkin is an easy and quick to work up crochet project for two different pumpkin sizes! You can also use this easily adjustable pattern to crochet pumpkins in many more custom sizes. This pattern features a beautiful ribbed texture made by working flat in rows, and then sewn together to create the three-dimensional shape. The yarn is held doubled for the larger pumpkin size. The Fall Harvest Pumpkin is perfect as Autumn décor for Halloween and Thanksgiving holidays. They also make great gifts during this chillier season of the year, and will surely be a hit at craft fairs too.
 The Fall Harvest Pumpkin is an easy and quick to work up crochet project for two different pumpkin sizes! You can also use this easily adjustable pattern to crochet pumpkins in many more custom sizes. This pattern features a beautiful ribbed texture made by working flat in rows, and then sewn together to create the three-dimensional shape. The yarn is held doubled for the larger pumpkin size. The Fall Harvest Pumpkin is perfect as Autumn décor for Halloween and Thanksgiving holidays. They also make great gifts during this chillier season of the year, and will surely be a hit at craft fairs too.
 This PDF pattern file includes written crochet instructions and photo references for both the large and small pumpkins.
Size:
- Large pumpkin height and width: 5 inches (13 cm)
- Small pumpkin height: 1.5 inches (4 cm), width: 2 inches (5 cm)
Level:
- ★★☆☆☆ Easy / Beginner
- Requires familiarity with stitches/techniques used (below) and sewing parts together.
- FO: fasten off
- St: stitch
- Ch: chain
- Sl st: slip stitch
- Hdc: half double crochet
- BLO: back loops only
- I-cord (video tutorial available)
Materials:
- Medium weight 4 yarn (held doubled throughout for the large pumpkin)
- 6mm crochet hook
- 9mm crochet hook
- Fiberfill stuffing
- Yarn needle
- Scissors
~ CROCHET INSTRUCTIONS ~
Note: Video tutorials are available. Scroll down to the 'Related Videos' section to view it on this page.
Body
Use orange/yellow yarn held doubled and the 6.00mm crochet hook.
Ch 22.
R1: Insert hdc in 3rd ch from hook. Hdc across the next 19 ch. (20 hdc)
R2: Ch 2, turn. Hdc across in BLO. (20 hdc)
R3-R22: Repeat R2.
FO with a long tail for sewing later.
Stem
Note: The stem is made using the “i-cord” crochet technique. Click here for the i-cord tutorial, or scroll down to see videos for this pattern below.
Use brown yarn held doubled and the 9.00mm crochet hook.
Set up the i-cord: Ch 3. Insert hook into 2nd ch from hook, YO, pull up a loop, insert hook into next ch, YO, and pull up a loop. (3 loops on hook)
R1: Drop 2 loops from hook, but hold onto them tightly with your non-hook hand so that they do not come undone. YO, pull through loop on hook. Insert hook into first dropped loop, YO, pull through. (2 loops on hook.) Insert hook into second dropped loop, YO, and pull through. (3 loops on hook)
R2-R4: Repeat R1.
To finish, YO and pull through all 3 loops on hook. FO with a long tail for sewing later.
~ FINISHING INSTRUCTIONS ~
(Includes both the large and small pumpkin instructions.)
- Take the rectangle that you made from the 'Head' instructions. String the long yarn end with a yarn needle. Use a running stitch across the top edge of the rectangle pumpkin body.
- Cinch the top closed by pulling tightly on the yarn tail. Continue sewing the sides of the pumpkin together, stitch by stitch.
- Stuff the pumpkin, but be careful not to stretch the stitches so much that gaps will appear.
- After stuffing, sew the bottom closed. Pull tightly to cinch the bottom closed.
- To make a pumpkin shape, insert the yarn needle from bottom through top of pumpkin, pulling tightly to create the center indent.
- Sew the stem to the top of the pumpkin.
- Get the arms and legs, and sew them to the body.
- Stuff the body, then sew it to the head.
Congratulations on finishing your Fall Harvest Pumpkin!
~ RELATED VIDEOS ~
Below are some videos that go along with parts of this pattern.
Crocheting in BLO
Here's how to crochet in back loops only, which is used for the body of the pattern.
Crocheting the Pumpkin Body
This video tutorial shows the technique for crocheting the pumpkin body. I demonstrate how to do so using a smaller pumpkin pattern with only one strand of yarn, a smaller crochet hook, and fewer starting chains and rows, but the technique is still the same.
Crocheting the Stem (I-Cord)
The i-cord is a technique used for the stem of this pumpkin. Click here for the written instructions and blog post, or view the video below.
If you enjoyed this free project, you can make a donation to support my work! Any amount is greatly appreciated and will go directly towards the yarn and supplies I use to keep creating new designs!
Also, if you'd like to download the beautifully-formatted, ad-free, and easy-to-read PDF version with photo references (see preview below), click here to purchase it for a small fee in my Ravelry shop or Etsy shop. Thank you for supporting Sweet Softies designs!
(Includes detailed step-by-step photo references for both the small and large pumpkins!)

Love the Fall Harvest Pumpkin pattern?
You might enjoy these other free designs. Simply click on the image below for the pattern, or check out all my free patterns here.
If you made this project and would like to share photos, I'd absolutely love to see! Here are links for sharing your finished creation:
- Sweet Softies Facebook Page
- Sweet Softies Amigurumi & Crochet Community Facebook Group
- Instagram, @SweetSofties
- Email: sweetsofties [at] gmail.com
- Or, feel free to share in the comments below! :)
As always, you are more than welcome to SHARE this post with any fellow crocheters who'd like to try this pattern! Thank you for reading, and I wish you all a wonderful day!
Best wishes,


.jpg)

.jpg)


