


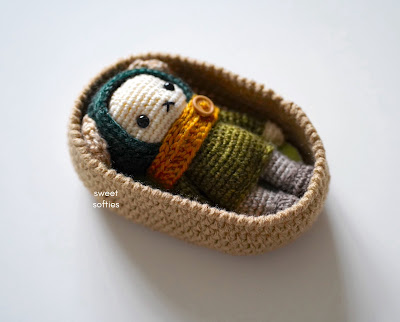
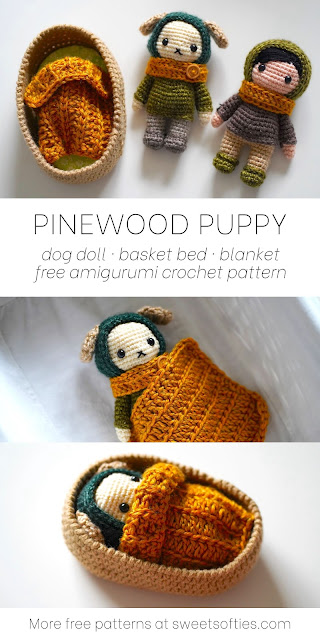
I love crocheting play sets when designing amigurumi! Here's my newest project, which features the adorable Pinewood Puppy doll, along with his basket bed and blanket. It's perfect for little ones to have lots of fun with pretend play.
Links
- Download the PDF pattern from my store, Ravelry, or Etsy
- Video preview of finished doll and items
- Save it on Pinterest
As you can see, Mr. Pinewood Puppy here fits perfectly inside of his basket bed! I have instructions in the PDF pattern to also include a mattress pad if you'd like as well, which will give added comfort to your sleeping pup.
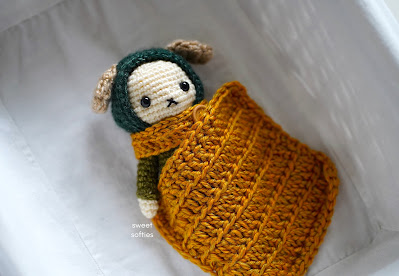
And here he is, all tucked in with his cozy blanket! I had a lot of fun creating a textured look with this blanket, and I think both the right and wrong sides are gorgeous.
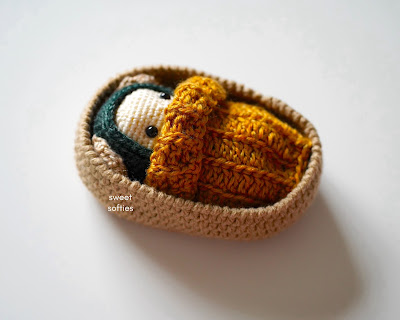
What do you think? Just look at that texture on the blanket!
Pattern Features
› Minimal sewing
What's really awesome is that the Pinewood Puppy doll is crocheted completely in one piece, EXCEPT for the ears! The ears are the only two parts that require sewing. Everything else is joined through crochet methods. I even have video tutorials for those parts in case it's a bit tricky, such as joining the legs and attaching the arms.

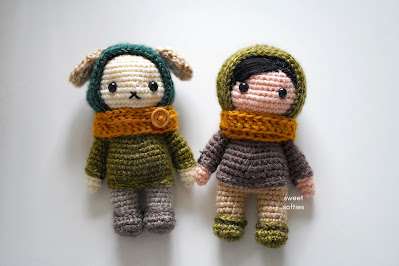
› Human doll modifications (This makes the doll completely no-sew!)
On that note, if you'd like to make the human doll version (shown above), please note that there's no sewing involved at all! Yay! The PDF pattern includes instructions for modifying the puppy doll pattern to make it into a human doll instead.
› Easily make any animal
You can also adapt this pattern to crochet different style ears instead of puppy dog ears, if you'd like. For instance, you can use ear instructions from my other patterns to make a...
- Bunny rabbit
- Kitty cat
- Bear
You can also PIN this pattern for later on your Crochet board.
Video Preview
Here's a short video preview to see the finished Pinewood Puppy doll and accessories! You can get a quick overview of the pattern and design in this video.
Free Pattern Version
The free version is for the puppy doll only.
The free version does NOT include:
- Basket
- Blanket
- Modification for the human doll
The complete set of instructions are available in the PDF pattern download.
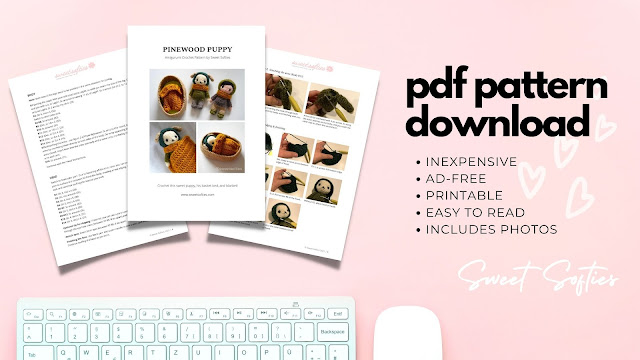
PDF Pattern Download
It's a 3-in-1 bundle with the Puppy Doll + Basket Bed + Blanket patterns! Also included are the slight modifications for the human doll. This PDF pattern is printable, ad-free, easy to read, and helps support Sweet Softies! (If you enjoy my free patterns, you can consider it as a donation to me when you buy one of my pattern PDFs! It allows me to maintain my blog and continue sharing more free patterns.)
Pinewood Puppy
Free Amigurumi Crochet Pattern
Terms of Use & Copyright Notice © 2022 Sweet Softies (www.sweetsofties.com). You have permission to sell finished products made from this pattern, but you must credit Sweet Softies as the owner/creator of this pattern by linking to my website (www.sweetsofties.com). No wholesale. You may not translate, copy, alter, or sell my patterns in part or in whole in any way. My patterns may not be used in video tutorials or teaching online classes. My patterns may be used in teaching in-person classes ONLY with written consent from me. You may link to this pattern but you may not copy any part of the pattern instructions on other websites.
Pattern Information
Intro:
The Pinewood Puppy is an adorable, pocket-sized buddy that would love to go on outdoor trips with you. This sweet dog wears a hood, sweater, pants, and warm scarf. It comes with a basket bed and a blanket, making this a fun play set for little ones to enjoy.The doll itself is almost a no-sew project as it is crocheted completely in one piece except for the dog ears. Instructions on how to adapt the pattern to a human doll are included. This project can also be easily customized to make different animals, such as a bunny rabbit, cat, fox, or bear, simply by crocheting different shapes for the ear section.
This woodland-themed amigurumi is a great addition to a gender neutral nursery. It also makes a great toy as a birthday gift or holiday surprise, enjoyed by both boys and girls. Encourage kids to explore the world by taking the Pinewood Puppy on a camping trip, hiking in the forest, or a walk in the neighborhood! Children will also have fun tucking their puppy into bed with a warm blanket.
The PDF pattern includes photo references and full written instructions to make the puppy doll, basket, blanket, as well as modifications for the human doll version.
Size:
Height of doll: 6 inches (15 cm)
Level of Difficulty:
★★☆☆☆ Familiar Beginner/Intermediate. Requires familiarity with stitches used (below), attaching yarn, changing yarn colors, attaching safety eyes, and sewing parts together.
Stitches/Terms Used:
- FO = fasten off
- MR = magic ring
- ch = chain
- sl st = slip stitch
- inc = increase
- dec = decrease
- sc = single crochet
- hdc = half double crochet
- dc = double crochet
- fhdc = foundation half double crochet
- Surface slip stitch
Materials:
- Medium weight yarn in desired colors
- 2.75mm crochet hook (for doll)
- 4mm crochet hook (for doll’s ears, basket, and blanket)
- 8mm plastic safety eyes
- Stuffing
- Yarn needle
- Scissors
Pattern Instructions
Notes (Read Before Beginning):
- Use the 2.75mm hook for all parts of the doll, except the ears. Use a 4mm hook for ears.
- Crochet in the order below, starting with the arms first.
- This doll is completely no-sew except for the ears (the only pieces that need to be sewn)
- The free version of this pattern includes instructions for the doll ONLY; no bed or blanket. For the complete set (doll + bed + blanket), please download the PDF pattern!
Video Links
Let's begin!
ARMS
Start with fur color yarn.R1: In a MR, insert 6 sc. (6)
R2: (Sc 2, inc) x 2. (8)
R3: Sc around. (8)
R4: (Sc 3, inc) x 2. (10)
Switch to sleeve color yarn.
R5-R12: Sc around. (10)
Lightly stuff the arms.
R13: (Sc 3, dec) x 2. (8)
R14: (Sc 2, dec) x 2. (6)
FO and weave in the ends. To finish, use the surface sl st method with sleeve-colored yarn between R4-R5. This creates a neat sleeve edging.
FEET
Start with shoe color yarn.R1: In a MR, insert 6 sc. (6)
R2: Inc around. (12)
R3: Sc 5, inc 2, sc 5. (14)
R4: Sc around. (14)
R5: Sc 5, dec 2, sc 5. (12)
Switch to pants color yarn.
R6: Sc around in BLO. (12)
R7-R9: Sc around. (12)
FO for Leg#1, but do not FO for Leg#2. Sc around the unworked front loops created during R6 using shoe-colored yarn. This creates a boot cuff.
BODY
Note: Both toes of the legs need to be pointed in the same direction for joining.R1 (Joining the Legs): With yarn still attached to Leg#2, sc until you reach the side of the leg. Ch 2 and join with a sc to Leg#1. Sc around remaining 11 sts of Leg#1. Sc 2 across the ch-2. Sc 12 around Leg#2. Sc 2 across the ch-2. (28)
R2: (Sc 6, inc) x 4. (32)
Switch to shirt color yarn.
R3-R8: Sc around. (32)
R9: (Dec, sc 14) x 2. (30)
R10: Sc around. (30)
R11: (Dec, sc 13) x 2. (28)
R12: (Dec, sc 5) x 4. (24)
R13: (Dec, sc 4) x 4. (20)
R14: (Dec, sc 3) x 4. (16)
R15 (Attaching the Arms – see Figure 2 of Photo References in PDF pattern): Sc around this round, but attach the arms by crocheting them directly to both sides of the body. Do so by squeezing the top of the arms closed. Insert hook into the arms and body at the same time, crocheting the arms in with 3 sc in each arm.
R16: Sc around. (16)
Continue with the ‘Head’ instructions.
HEAD
Switch to head color yarn. Due to fastening off the shirt color, you can now use the shirt color yarn to surface sl st between R2-R3 of the Body, creating a neat edging. Stuff the legs and body well, and continue stuffing the head as you work.R1: (Sc 3, inc) x 4. (20)
R2: (Sc, inc) around. (30)
R3: (Sc 4, inc) x 6. (36)
R4: (Sc 5, inc) x 6. (42)
R5-R7: Sc around. (42)
R8: (Sc 5, dec) x 6. (36)
R9-R12: Sc around. (36)
R13: (Sc 4, dec) x 6. (30)
R14: (Sc 3, dec) x 6. (24)
Optional tip for shaping: If desired, you can use a yarn needle and head-colored yarn to go through the eye hole areas (between R7-R8, 8 sts apart) and pull tightly to create an indent.
Attach eyes: Insert 8mm eyes between R7-R8, 8 sts apart.
Finishing the face: Use black yarn and a yarn needle to sew a nose and mouth to the face. Continue stuffing the head as you work.
R15: (Sc 2, dec) x 6. (18)
R16: (Sc, dec) x 6. (12)
R17: Dec around. (6)
FO with a tail to sew the hole shut.
HOOD
Note: See Figure 3 for photo references of the hood edging and finishing instructions.Use hood color yarn.
R1: In MR, ch 3 and insert 12 dc. *Join with a sl st to the first dc. (12)
R2: Ch 3, dc-inc around. *Join. (24)
R3: Ch 3, (dc, dc-inc) x 12. *Join. (36)
R4: Ch 3, dc 30. Leave the last 6 sts unworked. Do not join; we will now work in rows. (30)
R5-R6: Ch 3, turn. Dc across. (30 sts)
Edging: Ch 1. Instead of turning, sc across the hood’s bottom edge. Then, sc in BLO across R6 of the hood.
Finishing (you may choose one of two options):
Option #1 - no straps: Without FO, place the hood on the doll. Ch 8 (or however long to reach the other side of the hood). Sl st to the other bottom corner of the hood. FO with a long tail to sew a wooden button to that side. Weave in the ends.
Option #2 - straps: Add straps for tying with this video tutorial.
SCARF
Note: Video tutorial for the fdc is available here.Fdc until scarf is long enough to wrap around the doll’s neck at least twice. (About 12 inches long.)
FO with a long tail for sewing.
Wrap the scarf around the doll’s neck twice.
Sew a wooden button to the side of the scarf using the long yarn tail and a yarn needle.
PUPPY EARS (x2)
Note: Use the 4mm hook and ear-color yarn.R1: In MR, ch 3 and insert 12 dc. *Join with a sl st to the first dc. (12)
R2: Ch 3, dc around. *Join. (12)
R3: Ch 3, (dec, dc 4) x 2. *Join. (10)
FO with a long tail. After making both ears, sew them to both sides of the hood.
Congratulations on finishing your Pinewood Puppy!


Thank you for reading, and hope you have a fun time crocheting this project! If you'd like to help out my blog, feel free to check out my post, "5 Ways to Support my Blog!"
You might like my other designs if you enjoyed this one! Simply click on the image below for the pattern, or check out all my free patterns here.


I'd love to see your finished work from my designs! Here are links for sharing photos of your creations:

Best wishes,

.jpg)


