


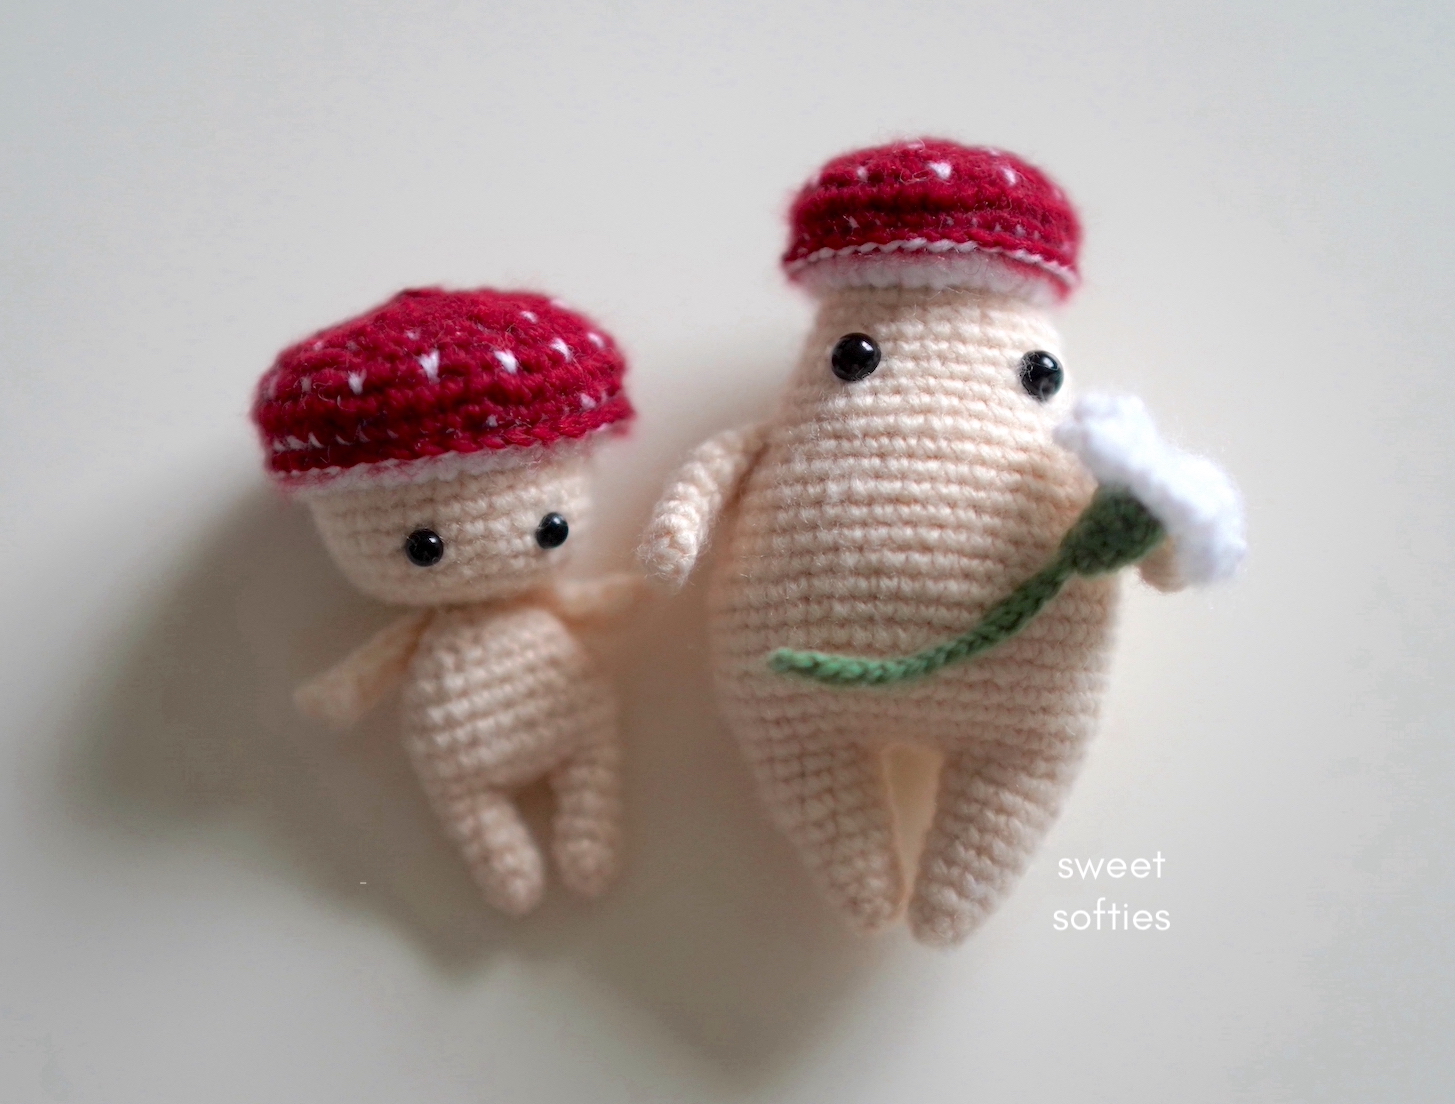
Being the woodland and fairytale enthusiast that I am, I decided to crochet an adorable pair of mushroom dolls. Please meet Baby Toadstool and Mr. Mushroom!
Baby Toadstool is a really sweet, little humanoid doll with a mushroom cap. He's shy and enjoys sniffing out the flowers in shady forest spots. If you see him in the woods, it's best to leave him be instead of plucking him up from his habitat and taking a photo of him! (As I am wrongfully demonstrating here!)

Mr. Mushroom is a cute chunkster who has a voluptuous body and a small mushroom cap. His mushroom cap is actually smaller than Baby Toadstool's! He enjoys traveling over dirt paths to scavenge for yummy goodies in and around the forest floor.

Both of these mushroom dolls are crocheted completely in one piece, except for the arms. Since you only need to sew the two arms on, there is minimal sewing for this project. The white speckled spots on the red mushroom cap are created through my heart-shaped color change technique, which I find to be an easy and fun way to add some visual detail into my projects.
Baby Toadstool's pattern is FREE to view on my blog! Scroll down to the crochet pattern section to learn how to make him.
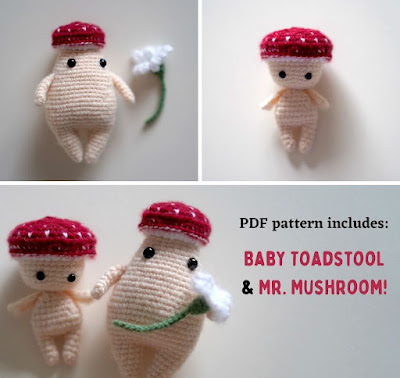
Love to make Mr. Mushroom too? Be sure to check out the 2-in-1 PDF pattern, which includes instructions both of these dolls!
If you like this design of mine, you can check out the other Amigurumi Patterns I have on my site, or click to see all my Free Crochet Patterns.


Get the PDF Pattern!
The 2-in-1 PDF pattern includes instructions for both Baby Toadstool and Mr. Mushroom! It is printable, ad-free, easy-to-read, includes photo references, and helps support Sweet Softies. (If you enjoy my free patterns, you can consider it as a donation to me when you buy one of my pattern PDFs! It allows me to maintain my blog and continue sharing more free patterns!)

BABY TOADSTOOL
Free Amigurumi Crochet Pattern
Copyright Notice -- © 2021 Sweet Softies (www.sweetsofties.com). You have permission to sell finished products made from this pattern, but you must credit Sweet Softies as the owner/creator of this pattern by linking to my website (www.sweetsofties.com). No wholesale. You may not translate, copy, alter, or sell my patterns in part or in whole in any way. My patterns may not be used in video tutorials or teaching online classes. My patterns may be used in teaching in-person classes ONLY with written consent from me. You may link to this pattern but you may not copy any part of the pattern instructions on other websites.
Intro:
The Baby Toadstool and Mister Mushroom patterns are made almost completely in one piece. Their nearly no-sew design requires sewing for only the two arms. Both mushrooms have white speckles on their red cap surfaces. The Baby Toadstool has an adorable chibi body shape that fits perfectly in a palm for extra cuteness, while Mr. Mushroom has a more chubby, fungi shape. This project comes with a sweet flower pattern too! Crochet this miniature set as a sweet gift for fairytale and woodland lovers. It can be made into a keychain or charm, and is easily customizable with different yarn colors and appliques.
Size:
Baby Toadstool Height: 4 inches (10.2 cm)
Mr. Mushroom Height: 5 inches (12.7 cm)
Level of Difficulty:
★★☆☆☆ Familiar Beginner.
Requires familiarity with stitches used (below) and changing yarn colors.
Stitches/Terms Used:
- FO = fasten off
- MR = magic ring
- ch = chain
- sl st = slip stitch
- sc = single crochet
- dc = double crochet
- inc = increase
- dec = decrease
- BLO = back loops only
- FLO = front loops only
Materials:
- Medium weight yarn (I used the colors cream, white, and red)
- 2.75mm crochet hook
- 6mm plastic safety eyes for Baby Toadstool
- Stuffing
- Yarn needle
- Scissors

Important Note (Read Before Beginning):
The mushroom dolls are made mostly in one piece. The only sewing involved is for the arms. Do not fasten off until instructed to do so.
ARMS (x2)
Note: Arms are made using the i-cord technique.Use cream-colored yarn to set up the i-cord: Ch 3. Insert hook into 2nd ch from hook, YO, pull up a loop, insert hook into next ch, YO, and pull up a loop. (3 loops on hook)
R1: Drop 2 loops from hook but hold onto them tightly with your non-hook hand so they don’t come undone. YO, pull through loop on hook. Insert hook in 1st dropped loop, YO, pull through. (2 loops on hook.) Insert hook into 2nd dropped loop, YO, and pull through. (3 loops on hook)
R2-R5: Repeat R1.
To finish, YO and pull through all 3 loops on hook. Fasten off with a tail for sewing to the body.
LEGS (x2)
Use cream-colored yarn.R1: In a MR, insert 6 sc. Pull the ring tight. (6)
R2-R5: Sc around. (6)
Fasten off for Leg#1, but do not fasten off for Leg#2. No need to stuff the legs. Continue with instructions for the body.
BODY
R1: With yarn still connected to Leg#2, ch 3. Join with a sc to Leg#1. Sc 5 around Leg #1 (total of 6 sc so far). Sc 3 across one side of the chain. Sc 6 around Leg#2. Sc 3 across the other side of the chain. (18)R2: (Sc 2, inc) x 6. (24)
R3: Sc around. (24)
R4: Sc around. (24)
R5: (Sc 6, dec) x 3. (21)
R6: (Sc 5, dec) x 3. (18)
R7: (Sc 4, dec) x 3 (15)
R8: (Sc 3, dec) x 3. (12)
R9: Dec around. (6)
Without fastening off, continue with the ‘Head’ instructions.
HEAD
R1: Inc around. (12)R2: (Sc, inc) x 6. (18)
R3: (Sc 2, inc) x 6. (24)
R4: (Sc 3, inc) x 6. (30)
R5-R9: Sc around. (30)
Insert 6mm eyes between R6-R7, 5 sts apart. Sew the two arms to both sides of the doll’s body, right at the neck. Without FO, continue with the ‘Mushroom Cap’ instructions below.
MUSHROOM CAP
Switch to white yarn, and continue working from the last round of the body.R1: Work in FLO. Ch 2, (dc 4, insert 2 dc in next st) x 6. (36)
Switch to red yarn.
R2: Work in BLO. (Sc 5, inc) x 6. (42)
R3: Sc around. (42)
R4: Sc around. (42) - Note: For white specks, alternate with white yarn every 3 sts using the Heart-Shaped Color Change video tutorial.
R5: (Sc 5, dec) x 6. (36)
R6: (Sc 4, dec) x 6. (30) - Note: For white specks, alternate with white yarn every 3 sts.
R7: (Sc 3, dec) x 6. (24)
R8: (Sc 2, dec) x 6. (18) - Note: Stuff the mushroom cap lightly.
R9: (Sc, dec) x 6. (12)
R10: Dec around. (6)
FO with a tail and sew the small hole shut.
Finishing Detail: Use red yarn to sl st around the unworked back loops created in R1 of the ‘Mushroom Cap.’ Video tutorial available.

FLOWER
Start with green yarn.R1: In MR, sc 6. (6)
R2: (Sc 2, inc) x 2. (8)
R3: (Sc 3, inc) x 2. (10)
R4: Sc around. (10)
Switch to white yarn. Sl st in the next st.
R5 (flower petals): (Sl st in next st, ch 10, sl st in same st. Then, sl st in next st, ch 8, sl st in same st) x 5. This will create 10 petals total.
FO with a tail to weave in.
Crochet the Stem: With green yarn, ch 15, then sl st in 2nd ch from hook. Sl st in each ch across. FO with a tail and sew to the bottom of the flower’s R1.
To finish, give your Baby Toadstool the flower!

Want the PDF Pattern?
The 2-in-1 PDF pattern includes instructions for both Baby Toadstool and Mr. Mushroom! It is printable, ad-free, easy-to-read, includes photo references, and helps support Sweet Softies. (If you enjoy my free patterns, you can consider it as a donation to me when you buy one of my pattern PDFs! It allows me to maintain my blog and continue sharing more free patterns!)
If you enjoyed this project, you might like my other designs! Simply click on the image below for the pattern, or check out all my free patterns here.


I'd love to see your finished work from my designs! Here are links for sharing photos of your creations:
- Sweet Softies Facebook Page
- Sweet Softies Amigurumi & Crochet Community Facebook Group
- Instagram, @SweetSofties
- Email: sweetsofties [at] gmail.com
Best wishes,

.jpg)


I am looking for some good blog sites for studying. I was searching over search engines and found your blog site. Well i like your high quality blog site design plus your posting abilities. Keep doing it.
ReplyDeleteYou have provided valuable data for us. It is great and informative for everyone. Keep posting always about magic mushrooms canada. I am very thankful to you.
ReplyDeletegreat job!
ReplyDelete