


Squid Game on Netflix is all the rage right now. Whether you talk about its characters, games or the famous squid game cookie (known as dalgona candy), everything has been trending nowadays.
I normally detest watching anything with horror and gore, but I got looped into watching this series in Korean (which I don't understand) and Chinese subtitles (which I can't read fast nor well) with my husband and mother-in-law. They were pretty gung ho about checking out this popular series, and well...I guess it doesn't disappoint if you're a hardcore action, thriller, and drama fan!
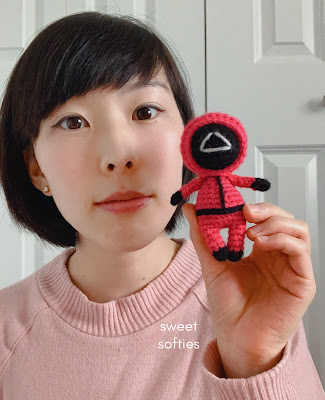
Look how tiny he is!
I'm frankly not, but the characters' stories and their interactions do draw me in. I have to say, my favorite character is Ali by far. He's such a good cookie!!
Anyhow, in order to cope with watching this terrifying drama, I decided to whip up a cute, miniature version of the Squid Game soldier. Or worker, I suppose. Since I'm half-watching the series (hiding behind my laptop and not really understanding the fast Chinese subtitles that fly by before my brain can process it), I'm still honestly not sure what the shapes on their masks mean! I know it specifies some sort of hierarchy amongst the workers, but I haven't been paying attention to what the actual ranks are or which type of role each shape signifies.
So... I guess I'll reveal now that I decided to make a TRIANGLE worker because it was the easiest shape to sew on.

Yep... that's the big reveal.
If you want to try your hand at sewing a circle, then by all means, go for it! Props to you!! Seriously, I'm clapping for you right now, because drawing a decent circle on paper is hard enough for me...much less sewing!
Alright, so let's get on with it! I've decided to share this pattern for FREE on my blog, because why not! Let's hear it for all of you Squid Game fans!
I know there are probably tons of Squid Game amigurumi patterns out there, but I hope you'll enjoy my particular design for its special features below.


Unique Design Features
- Removable hood! You can pull the hood back to show the head of the doll.
- Minimal sewing. You only need to sew the arms and head to the body, which are relatively quick and easy to do.
- Adorable chibi shape. Yes to tiny stumpy legs and chubby bellies!
- Clean trim around opening of hood. Thoughtful, little details like this make the finished product look tidier and more "complete"!

Finished Product Video
Want to see this little guy in motion? Check out my quick product preview video, which will give you a look at the features of this design!
If you like this design of mine, you can check out the other Amigurumi Patterns I have on my site, or click to see all my Free Crochet Patterns!


Want the PDF Pattern?
The PDF is printable, ad-free, easy-to-read, includes photo references, and helps support Sweet Softies. (If you enjoy my free patterns, you can consider it as a donation to me when you buy one of my pattern PDFs! It allows me to maintain my blog and continue sharing more free patterns!)

SQUID GAME DOLL
Free Amigurumi Crochet Pattern
Copyright Notice -- © 2021 Sweet Softies (www.sweetsofties.com). You have permission to sell finished products made from this pattern, but you must credit Sweet Softies as the owner/creator of this pattern by linking to my website (www.sweetsofties.com). No wholesale. You may not translate, copy, alter, or sell my patterns in part or in whole in any way. My patterns may not be used in video tutorials or teaching online classes. My patterns may be used in teaching in-person classes ONLY with written consent from me. You may link to this pattern but you may not copy any part of the pattern instructions on other websites.

Intro:
This doll is an adorable, mini version of the pink and black outfitted workers in the horror Netflix TV series, Squid Games. The design features a removable hood and minimal sewing, requiring sewing only for the arms and head. The PDF pattern includes full written instructions and photo references for making the worker doll.
Size:
Height: 6 inches (15 cm)
Level of Difficulty:
★★☆☆☆ Familiar Beginner.
Requires familiarity with stitches used (below), attaching yarn, changing yarn colors, and sewing parts together.
Stitches/Terms Used:
- FO = fasten off
- MR = magic ring
- ch = chain
- sl st = slip stitch
- inc = increase
- dec = decrease
- sc = single crochet
- dc = double crochet
- dc-inc = insert 2 dc in the same stitch
- Surface slip stitch
Materials:
- Medium weight yarn in black, pink, and light grey
- 2.75mm crochet hook
- Stuffing
- Yarn needle
- Scissors

Notes (Read Before Beginning):
Some finishing directions (like sewing the arms and head to the body) will be done before the hood is made. The hood is crocheted last because it will go over the completed doll.
HEAD
Use black yarn.
R1: In a MR, insert 6 sc. Pull the ring tight. (6)
R2: Inc around. (12)
R3: (Sc, inc) x 6. (18)
R4: (Sc 2, inc) x 6. (24)
R5-R9: Sc around. (24)
R10: (Sc 2, dec) x 6. (18)
R11: (Sc, dec) x 6. (12)
Stuff the head well.
R12: Dec around. (6)
Fasten off.
LEGS (x2)
Start with black yarn.
R1: In a MR, insert 6 sc. Pull the ring tight. (6)
R2: Sc around. (6)
Switch to pink yarn.
R3-R6: Sc around. (6)
Fasten off for Leg#1, but do not fasten off for Leg#2. No need to stuff the legs. Continue with instructions for the body.
BODY
R1: With pink yarn still connected to Leg#2, ch 3. Join with a sc to Leg#1. Sc 5 around Leg #1 (total of 6 sc so far). Sc 3 across one side of the chain. Sc 6 around Leg#2. Sc 3 across the other side of the chain. (18)
R2: (Sc 2, inc) x 6. (24)
R3-R4: Sc around. (24)
R5: (Sc 6, dec) x 3. (21)
R6: Sc around. (21)
R7: (Sc 5, dec) x 3. (18)
R8: (Sc 4, dec) x 3 (15)
R9: (Sc 3, dec) x 3. (12)
R10: (Sc 2, dec) x 3. (9)
R11: (Sc, dec) x 3. (6)
Fasten off with a long tail for sewing to the head later.

ARMS (x2)
Note: The arms are made using the i-cord technique. Use black yarn to begin.
Begin by setting up the i-cord: Ch 3. Insert hook into 2nd ch from hook, YO, pull up a loop, insert hook into next ch, YO, and pull up a loop. (3 loops on hook)
R1: Drop 2 loops from hook, but hold onto them tightly with your non-hook hand so that they do not come undone. YO, pull through loop on hook. Insert hook into 1st dropped loop, YO, pull through. (2 loops on hook.) Insert hook into 2nd dropped loop, YO, and pull through. (3 loops on hook)
Switch to pink yarn.
R2-R6: Repeat R1.
To finish, YO and pull through all 3 loops on hook. Fasten off with a long tail for sewing to the body.

FINISHING INSTRUCTIONS
Note: Follow these finishing instructions to complete the doll. The hood will be made last.
- To make the belt, you will need black yarn. Use the surface slip stitch technique between the Body’s R3-R4. You may start from the center-back of the doll and work around the entire round. Fasten off and weave in the ends.
- To finish the “jacket”, use black yarn to sew a straight line down the middle of the body’s front.
- Stuff the body.
- Sew the two arms to the side of the body.
- Use light grey yarn and a yarn needle to sew the soldier’s symbol (circle, triangle, or square) to the head.
- Sew body and head together, using the long yarn tail from the body.
- At this point, your doll is nearly complete. Only the hood is needed!
HOOD
R1: In a MR, ch 3 (does not count as a dc) and insert 12 dc. Pull the ring tight. Join with a sl st to the top of the first dc. (12)
R2: Ch 3. Dc-inc around. Join with a sl st to the first dc. (24)
R3: Ch 3. Dc around. Do not join. We will now work in turned rounds. (24)
R4: Ch 3, turn. Dc across. (24)
R5: Ch 1, turn. Sc across. (24)
Without fastening off from the hood, follow these instructions to affix the hood on the doll’s head. (Photo references are available in the PDF pattern.)
- Position the hood over the head.
- Ch 3, then join to the other side of the hood with a sl st in R5’s first stitch.
- Sl st around R5 of the hood.
- If desired, fasten off at this point, OR, crochet an extra trim around the bottom of the hood. To do so, sc across the bottom edge of the hood. When you get to the ch-3 at the doll’s chin, insert a sl st in each of the ch. Lastly, fasten off and weave in the ends.

Congratulations on finishing your Squid Game Doll!
Want the PDF Pattern?
The PDF is printable, ad-free, easy-to-read, includes photo references, and helps support Sweet Softies. (If you enjoy my free patterns, you can consider it as a donation to me when you buy one of my pattern PDFs! It allows me to maintain my blog and continue sharing more free patterns!)
If you enjoyed this project, you might like my other designs! Simply click on the image below for the pattern, or check out all my free patterns here.


I'd love to see your finished work from my designs! Here are links for sharing photos of your creations:
- Sweet Softies Facebook Page
- Sweet Softies Amigurumi & Crochet Community Facebook Group
- Instagram, @SweetSofties
- Email: sweetsofties [at] gmail.com
Best wishes,

.jpg)


Love this. I'm going to try and make one when I find the time. Thank you for sharing :)
ReplyDeleteYay! So glad you like this pattern. Happy crocheting! :)
DeleteThose dolls are so cute and you are as cute as they are.
ReplyDeleteAww, thank you so much! Your sweet comment made me smile!! :)
DeleteThis article provided me with a lot of useful information about Indoor Playground Equipment. The material you presented during this post provided me with some excellent information. Continue to post.
ReplyDeleteI have just finished making this since very early this morning, i used a size 2.5 mm hook which was a bit difficult but so worth it! Spectacular!! Love it! Thank you so much! I will be making another with a 3mm hook next as i don't have the 2.75 mm lolz
ReplyDelete