


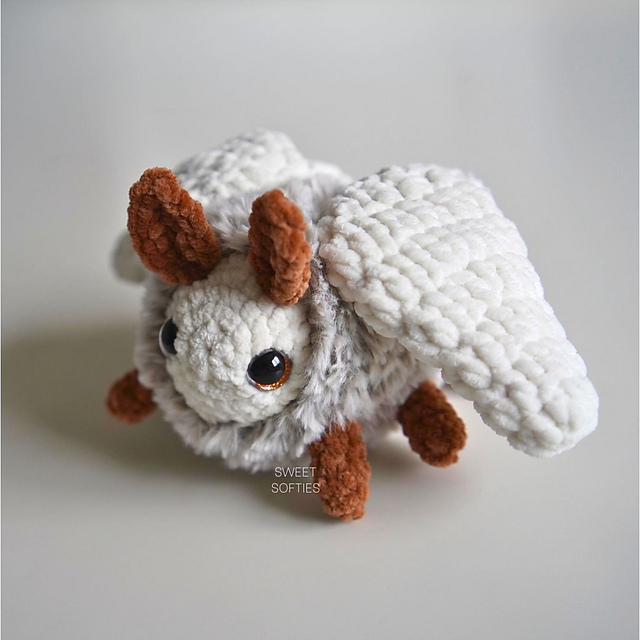
Looking for an adorable and unique amigurumi to make? I hope you'll like my newest creation!
Meet the Mimuu Moth, an original character designed by Sweet Softies! The Mimuu Moth has two plush antennae and a pair of soft wings. This amigurumi works up relatively fast, making it a fun and satisfying project.
Recommended Yarn
This sweet doll is designed with Hobbii's plush yarn (Baby Snuggle, Honey Bunny, and Toucan are great choices). This chenille velvet yarn makes wonderfully soft and squishy amigurumi doll. The furry portions are crocheted using Lion Brand Yarn's Go for Faux Yarn, which is silky-soft to the touch! It's a heavenly combination to make an incredibly lovable and cuddly moth doll.
Other types of super bulky weight 6 plush and faux fur yarn can be tried to create different looks and textures, too.

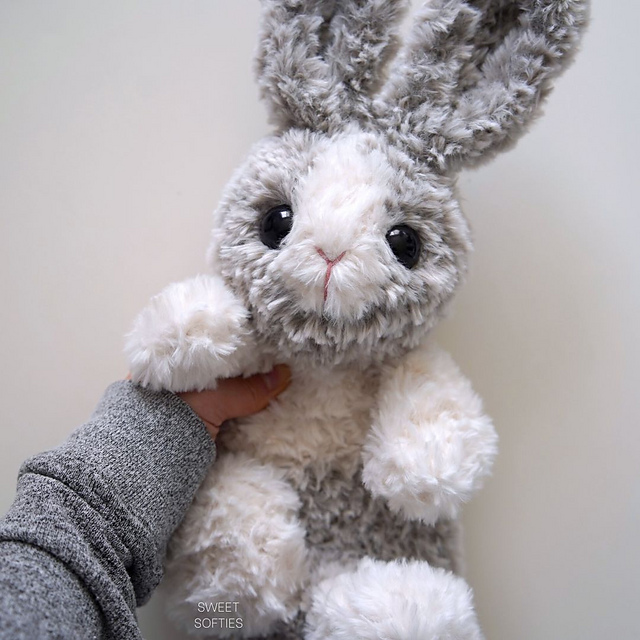
Mimuu Dolls
Mimuu dolls are designed with plush (chenille velvet) yarn and faux fur yarn, and feature a humanoid doll dressed in animal-inspired costumes. They are an original design by Sweet Softies! Here's another member of the collection: the Mimuu Fox.
PDF Pattern
The PDF pattern is printable, ad-free, easy to read, and helps support Sweet Softies! (If you enjoy my free patterns, you can consider it as a donation to me when you buy one of my pattern PDFs! It allows me to maintain my blog and continue sharing more free patterns.)

MIMUU MOTH
Free Amigurumi Crochet Pattern
Terms of Use & Copyright Notice © 2025 Sweet Softies (www.sweetsofties.com). You have permission to sell finished products made from this pattern, but you must credit Sweet Softies as the owner/creator of this pattern by linking to my website (www.sweetsofties.com). No wholesale. You may not translate, copy, alter, or sell my patterns in part or in whole in any way. My patterns may not be used in video tutorials or teaching online classes. My patterns may be used in teaching in-person classes ONLY with written consent from me. You may link to this pattern but you may not copy any part of the pattern instructions on other websites.

Pattern Info
Size:
Level of Difficulty:
★★★☆☆ Intermediate. Requires familiarity with stitches used (below), working with furry/textured yarn, and sewing pieces together.Stitches/Terms Used:
- MR = magic ring
- FO = fasten off
- ch = chain
- sl st = slip stitch
- sc = single crochet
- inc = increase (insert 2 sc in same st)
- dec = decrease (sc 2 sts together)
- hdc = half double crochet
- dc = double crochet
- dc-inc = dc increase (insert 2 dc in the same st)
Materials:
- Super bulky weight chenille velvet yarn in desired colors (I used Hobbii's Honey Bunny yarn in peach, brown, and green)
- Super bulky weight faux fur yarn in desired color (I used Go for Faux Yarn)
- 6mm crochet hook (I use these)
- Two 9mm plastic safety eyes (I use these)
- Fiberfill stuffing
- Yarn needle
- Scissors
Crochet Instructions
Note: The free version of the pattern comes in written instructions (below). If you want an ad-free printable version of the written instructions with photo references, please download the low-cost PDF pattern.
LEGS (x2)
Use skin-colored plush yarn.R1: Ch 2. Insert 5 sc in the 2nd ch from hook. (5)
Note: Alternatively, you can insert 5 sc in a magic ring (MR) instead of the chain method in R1.
R2: Sc 4, inc. (6)
R3: Sc around. (6)
FO with a long tail for sewing to the body later.
R1: Ch 2. Insert 4 sc in the 2nd ch from hook. (4)
R3: Sc around. (6)
FO with a long tail for sewing to the body later.
ARMS (x2)
Use skin-colored plush yarn.R1: Ch 2. Insert 4 sc in the 2nd ch from hook. (4)
Note: Alternatively, you can insert 4 sc in a magic ring (MR) instead of the chain method in R1.
R2: Sc around. (4)
R3: Sc 3, inc. (5)
R4-R9: Sc around. (5)
FO with a long tail for sewing to the body later.
Ch 2. In the 2nd ch from hook: sc, hdc, dc, ch 2, dc, hdc, sc.
FO with a long tail for sewing to the hood later.
R1: Ch 4. Insert 10 dc in the 2nd ch from hook. *Join with a sl st to the first dc. (10)
R2: Sc around. (4)
R3: Sc 3, inc. (5)
R4-R9: Sc around. (5)
FO with a long tail for sewing to the body later.
ANTENNAE (x2)
Use antennae-colored plush yarn.Ch 2. In the 2nd ch from hook: sc, hdc, dc, ch 2, dc, hdc, sc.
FO with a long tail for sewing to the hood later.
WINGS (x2)
Use wing-colored plush yarn.R1: Ch 4. Insert 10 dc in the 2nd ch from hook. *Join with a sl st to the first dc. (10)
Note: Alternatively, you can insert 3 ch and 10 dc in a magic ring (MR) instead of the chain method in R1.
R2: Ch 2, (dc 4, dc-inc) x 2. *Join. (12)
R3: Ch 2, dc around. *Join. (12)
R4: Ch 2, (dc 4, dc-dec) x 2. *Join. (10)
R5: Ch 2, (dc 3, dc-dec) x 2. *Join. (8)
R6: Ch 2, (dc 2, dc-dec) x 2. *Join. (6)
R7: Ch, (sc, dec) x 2. *Join. (4)
FO with a long tail for sewing to the body later.
R1: Ch 2. Insert 6 sc in the 2nd ch from hook. (6)
Note: Alternatively, you can insert 6 sc in a magic ring (MR) instead of the chain method in R1.
R2: Inc around. (12)
R3: (Sc, inc) x 6. (18)
R4: (Sc 2, inc) x 6. (24)
R5-R7: Sc around. (24)
R8: (Sc 6, dec) x 3. (21)
R9: (Sc 5, dec) x 3. (18)
R10: (Sc 4, dec) x 3. (15)
R11: (Sc 3, dec) x 3. (12)
R12: Sc around. (12)
Switch to plush yarn and continue with the Head. Fur yarn may be FO to weave in later.
Note: If desired, use the wrong-side out in fur yarn pieces for a furrier look. That means you will need to work in the reverse direction after switching to plush yarn for the ‘Head’ section next, so that the plush yarn for the Head is crocheted right-side out.
R1: Sc around. (12)
R2: Inc around. (24)
R3-R6: Sc around. (24)
Switch to hair-colored plush yarn.
R7: Sc around. (24)
R8: Work in BLO this entire round. (Sc 2, dec) x 6. (18)
Insert 9mm eyes between R4-R5, 4 sts apart.
Stuff the head well.
R9: (Sc, dec) x 6. (12)
R10: Dec around. (6)
FO with a tail for sewing the opening closed.
R1: Ch 4. Insert 10 dc in the 4th ch from hook. *Join with a sl st to the first dc. (10)
R2: Ch 2, dc-inc around. *Join. (20)
R3: Ch 2, dc around. *Join. (20)
R4: Ch 2, dc 16. Leave the last 4 sts unworked. (20)
We will now work in turned rows.
R5-R6: Ch 2, turn. Dc across. (16)
R7: Turn. Sk the first st. Sl st, sc 3, hdc, dc 4, hdc, sc 3, sl st , sk the next st.
Do not FO yet. Place the hood over the doll’s head (R7 will be framing the face as an upside-down U-shape). Ch 5, then sl st to join to the other side of the hood. This will secure the hood to the head. FO with a tail for weaving in.
R2: Ch 2, (dc 4, dc-inc) x 2. *Join. (12)
R3: Ch 2, dc around. *Join. (12)
R4: Ch 2, (dc 4, dc-dec) x 2. *Join. (10)
R5: Ch 2, (dc 3, dc-dec) x 2. *Join. (8)
R6: Ch 2, (dc 2, dc-dec) x 2. *Join. (6)
R7: Ch, (sc, dec) x 2. *Join. (4)
FO with a long tail for sewing to the body later.
BODY
Use fur yarn.R1: Ch 2. Insert 6 sc in the 2nd ch from hook. (6)
Note: Alternatively, you can insert 6 sc in a magic ring (MR) instead of the chain method in R1.
R2: Inc around. (12)
R3: (Sc, inc) x 6. (18)
R4: (Sc 2, inc) x 6. (24)
R5-R7: Sc around. (24)
R8: (Sc 6, dec) x 3. (21)
R9: (Sc 5, dec) x 3. (18)
R10: (Sc 4, dec) x 3. (15)
R11: (Sc 3, dec) x 3. (12)
R12: Sc around. (12)
Switch to plush yarn and continue with the Head. Fur yarn may be FO to weave in later.
Note: If desired, use the wrong-side out in fur yarn pieces for a furrier look. That means you will need to work in the reverse direction after switching to plush yarn for the ‘Head’ section next, so that the plush yarn for the Head is crocheted right-side out.
HEAD
Use skin-colored plush yarn.R1: Sc around. (12)
R2: Inc around. (24)
R3-R6: Sc around. (24)
Switch to hair-colored plush yarn.
R7: Sc around. (24)
R8: Work in BLO this entire round. (Sc 2, dec) x 6. (18)
Insert 9mm eyes between R4-R5, 4 sts apart.
Stuff the head well.
R9: (Sc, dec) x 6. (12)
R10: Dec around. (6)
FO with a tail for sewing the opening closed.
BANGS:
- Mark the 7 center sts of R8 of the Head.
- Attach hair-colored plush yarn to the first unworked front loop created in R8 of the Head.
- Ch 2, dc around. However, when you reach the first marked st, do the following across the center 7 sts: Hdc, ch, sl st, ch, hdc, dc, hdc, ch, sl st, ch, hdc.
- After that, continue to dc in the remaining sts. Join with a sl st to the first dc.
- FO with a long tail, which you’ll use to sew every few sts of the bangs down to the head. This will just help the bangs stay in place better.
HOOD
Use fur yarn.R1: Ch 4. Insert 10 dc in the 4th ch from hook. *Join with a sl st to the first dc. (10)
R2: Ch 2, dc-inc around. *Join. (20)
R3: Ch 2, dc around. *Join. (20)
R4: Ch 2, dc 16. Leave the last 4 sts unworked. (20)
We will now work in turned rows.
R5-R6: Ch 2, turn. Dc across. (16)
R7: Turn. Sk the first st. Sl st, sc 3, hdc, dc 4, hdc, sc 3, sl st , sk the next st.
Do not FO yet. Place the hood over the doll’s head (R7 will be framing the face as an upside-down U-shape). Ch 5, then sl st to join to the other side of the hood. This will secure the hood to the head. FO with a tail for weaving in.
FINISHING
- Sew arms to sides of the neck, between the fur yarn and plush yarn change.
- Sew the legs to the doll. (I positioned mine towards the front, like a “sitting” pose.)
- Sew the antennae to the top of the hood.
- Sew the small openings of the two wings to the back of the doll’s neck, between the fur and plush yarn change. Weave in all ends. Congratulations on finishing!

Thank you for reading, and hope you had a fun time crocheting this project! If you'd like to help out my blog, feel free to check out my post, "5 Ways to Support my Blog!"
You might like my other designs if you enjoyed this one! Simply click on the image below for the pattern, or check out all my free patterns here.
I'd love to see your finished work from my designs! Here are links for sharing photos of your creations:
Best wishes,

Disclosure: This post may contain affiliate links, meaning I get a commission if you decide to make a purchase through my links, at no cost to you.
.jpg)


