


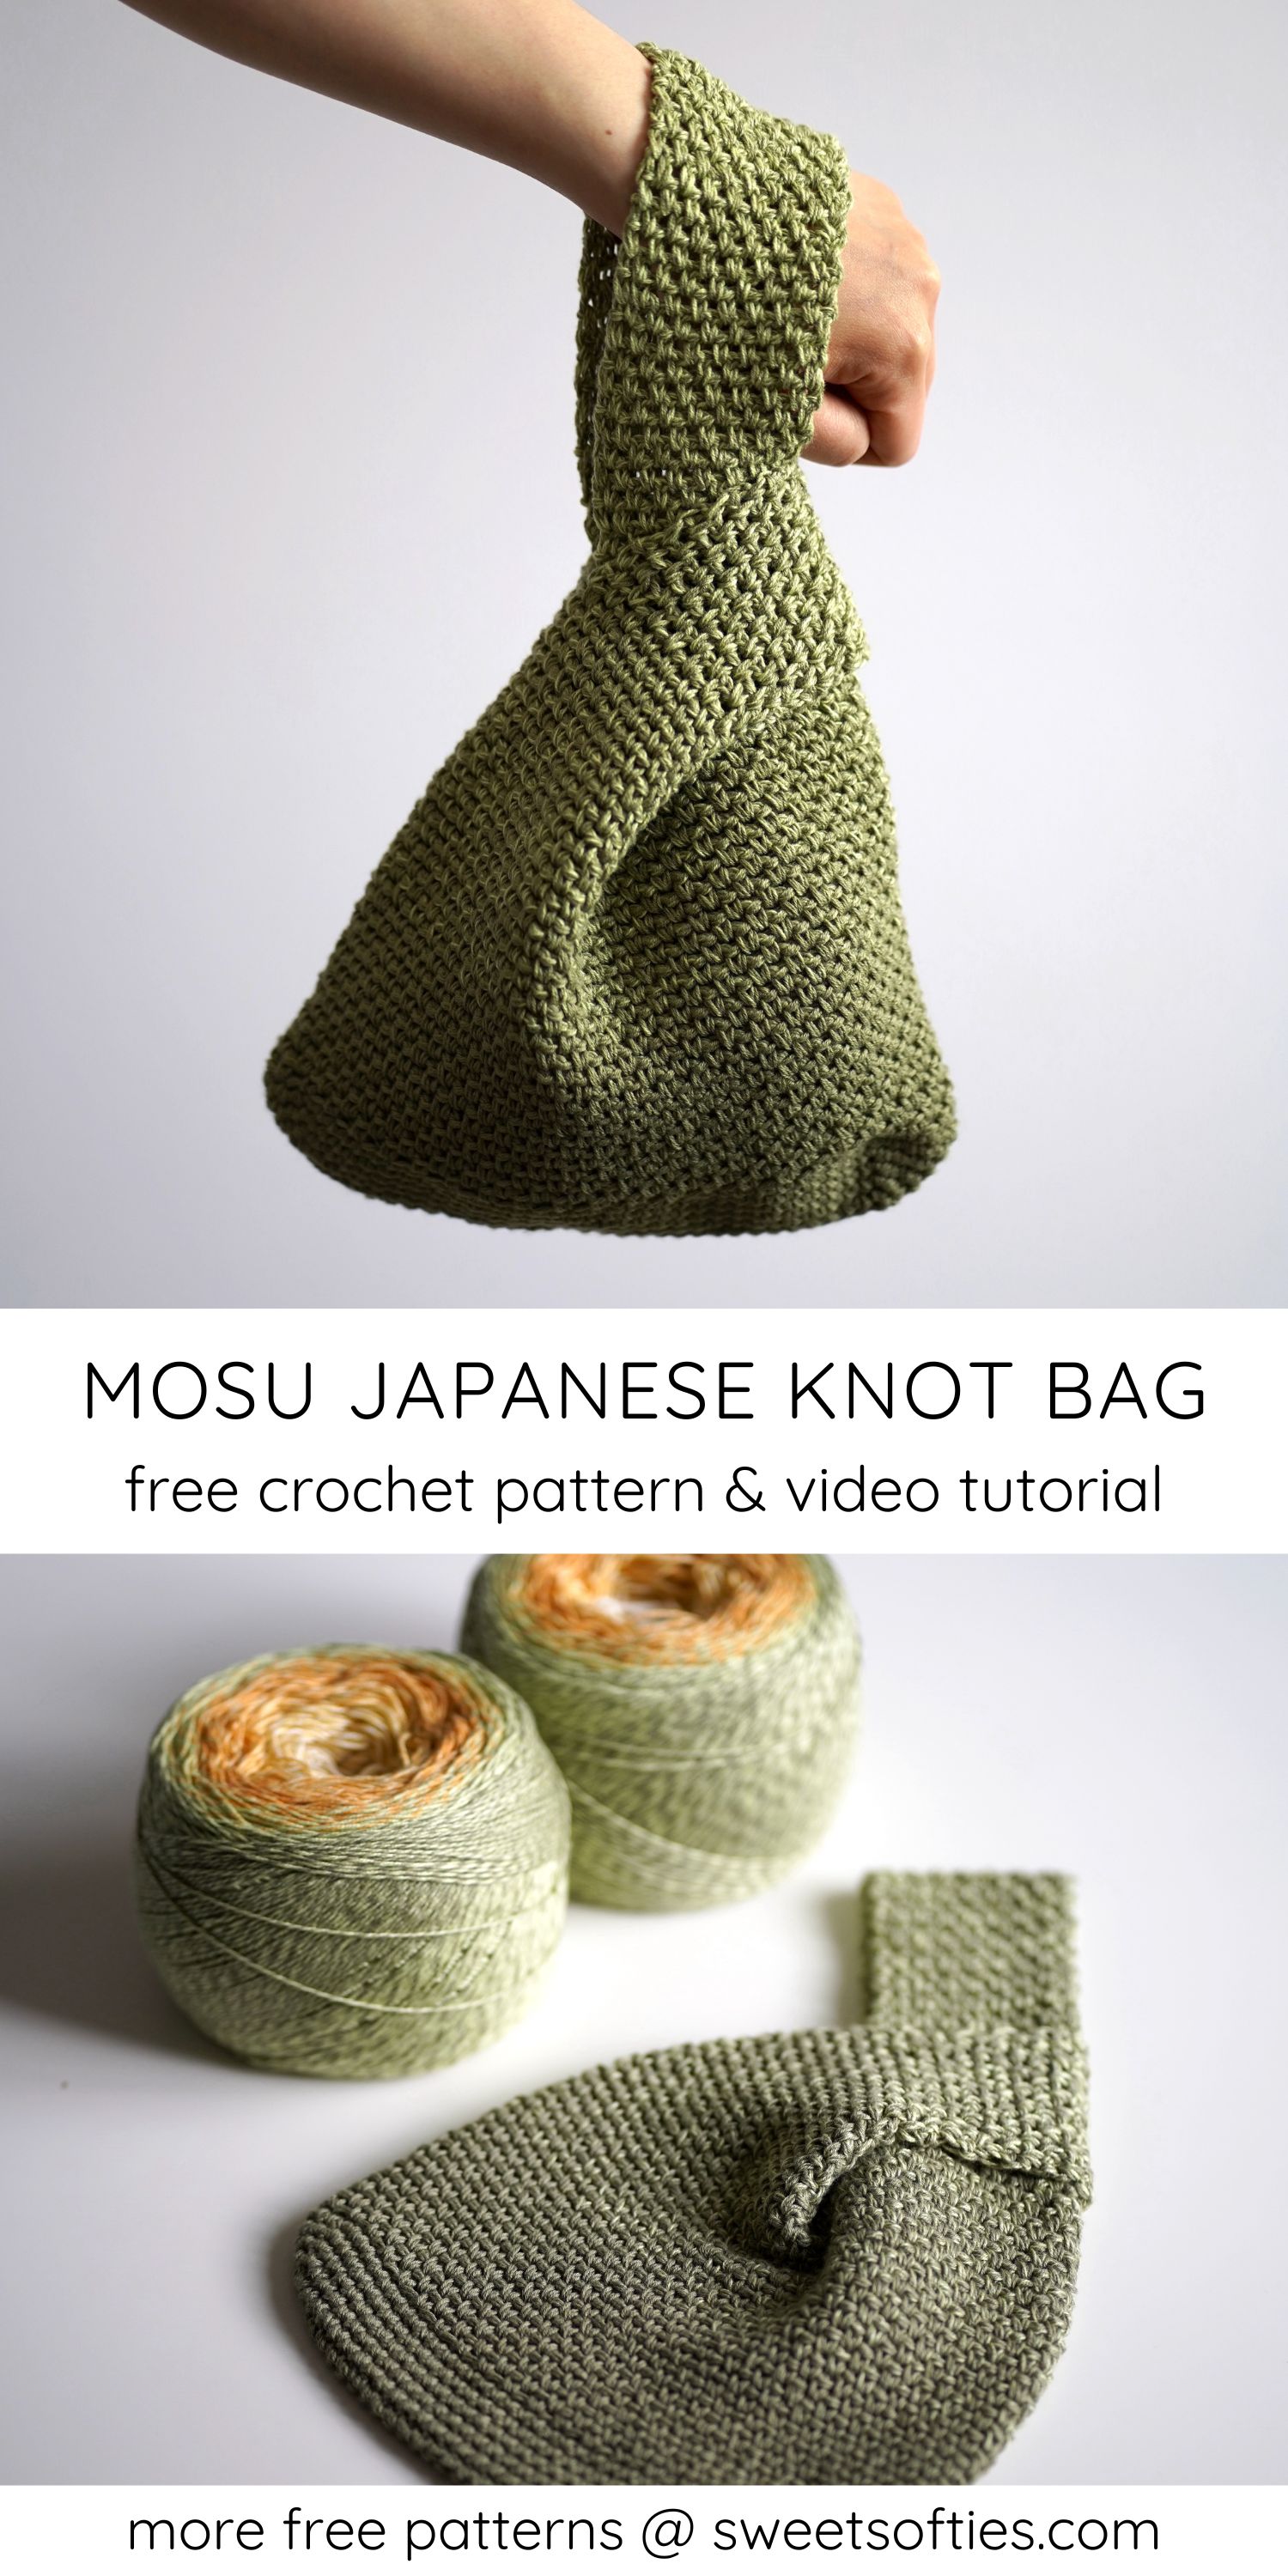
I've been wanting to sew a Japanese Knot Bag for myself for quite some time now because the design is so handy, practical, and would look great year-round. I finally decided to go for it -- except with yarn!
Links:
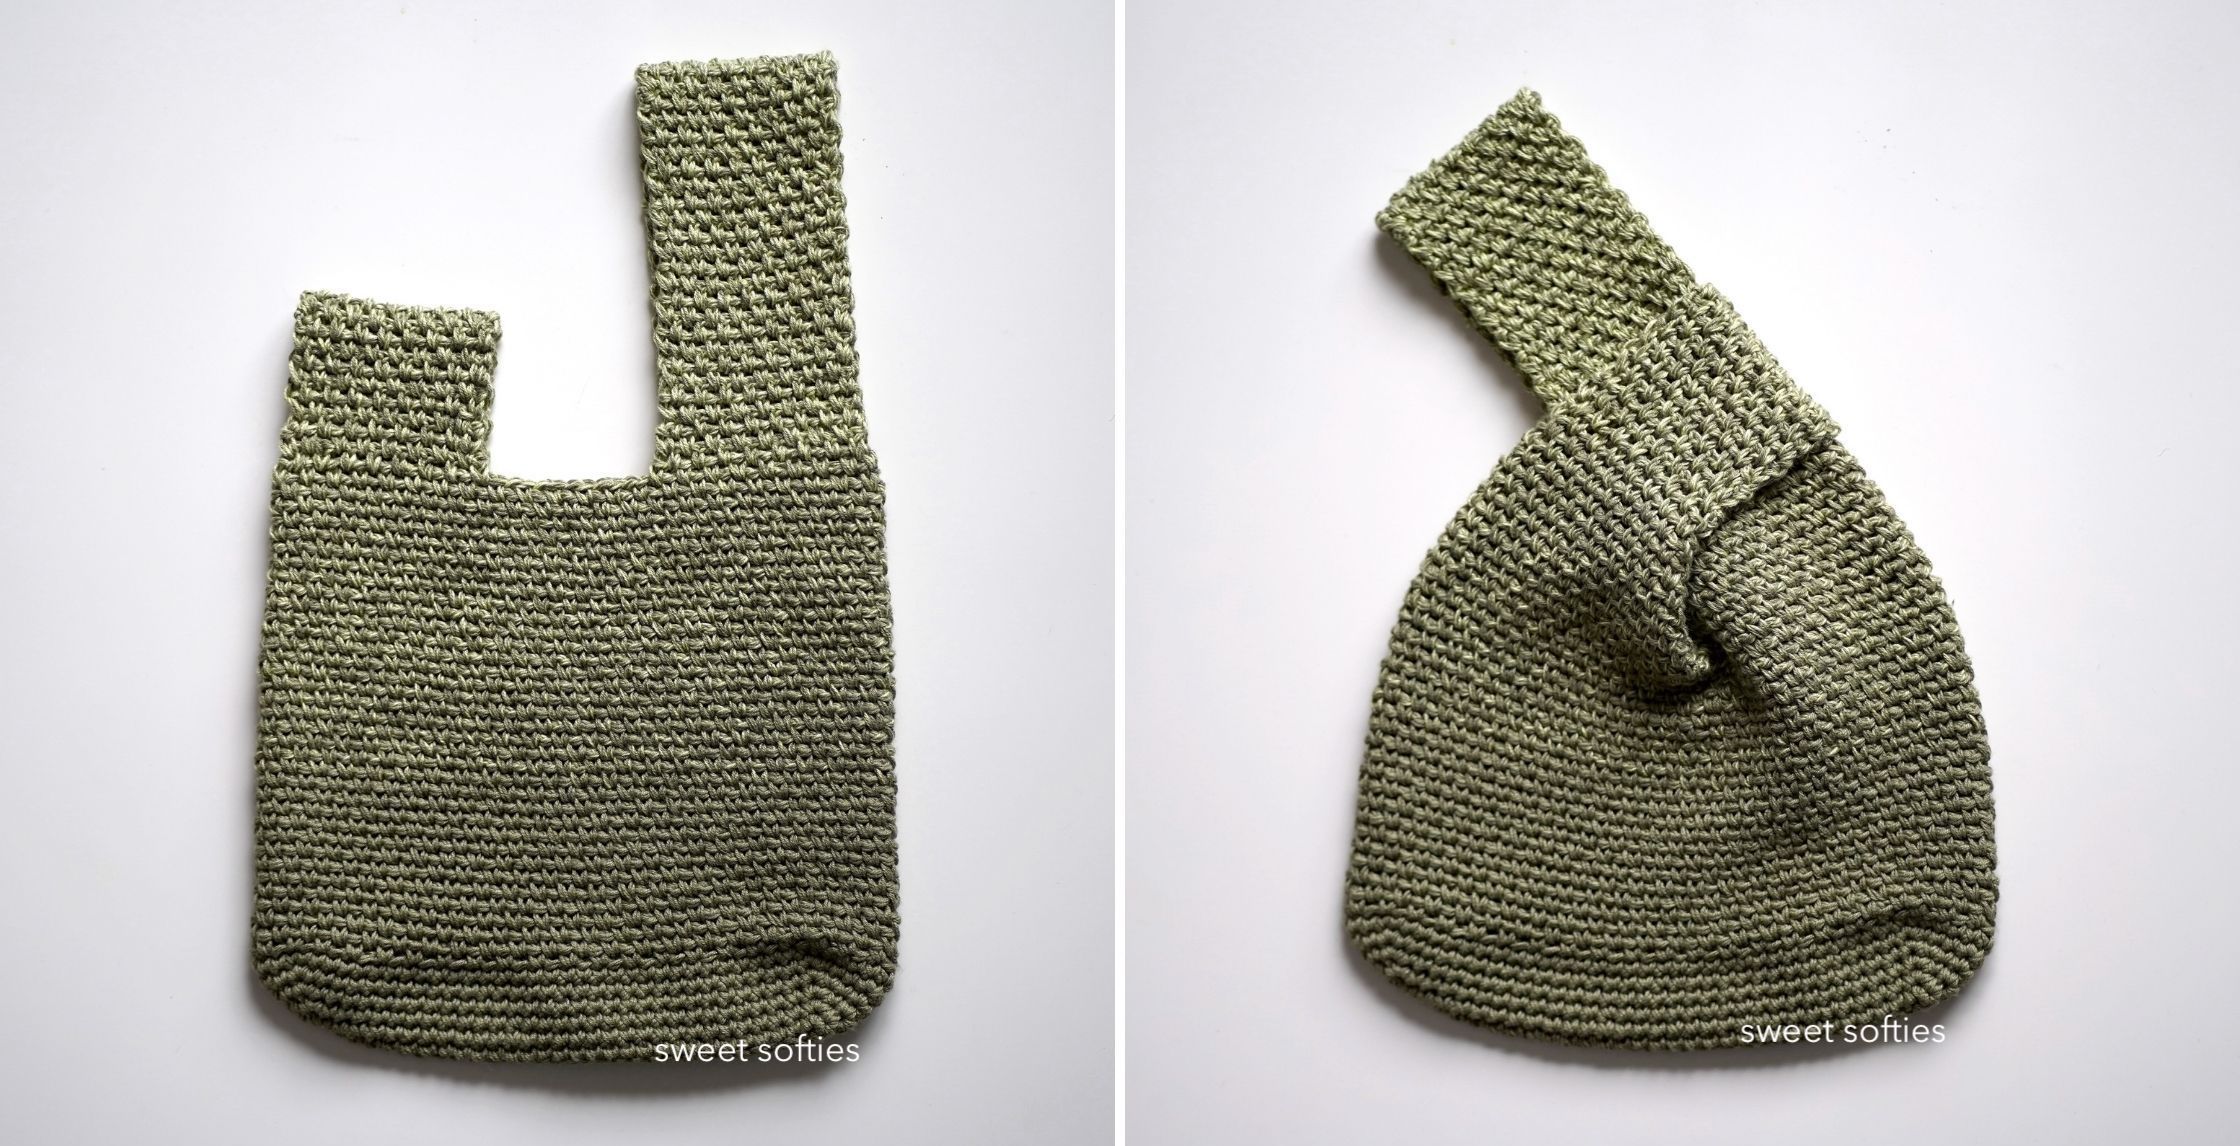
The name of this bag, Mosu, is inspired by the moss stitch used in this design, as it is the Japanese word for "moss". The moss stitch, also known as the linen stitch, is very easy to crochet. It produces a beautiful texture as the final result while maintaining a minimal look (perfect for that minimalist aesthetic)!
I was waiting for the perfect yarn to come along to make this bag, and finally found it with the beautiful Twister Summer yarn from Hobbii. (Update: The Twister Summer yarn has now been discontinued, but here's the regular Twister yarn, which offers a lot of other beautiful color gradients!)
I created this bag as part of their #HobbiicationJunior challenge, which is to create something fun, practical, and handy to use when traveling with little ones this summer!

Anyhow, you'll be happy to know that this bag is made completely in one piece to minimize sewing. It's easy and therapeutic to work on because the pattern itself is quite repetitive and simple. It also comes with a full video tutorial for those who would like to crochet along with me!
There's a lot of customization that can take place, too. The size can be easily adjusted and customized by adding (or decreasing) rounds/rows, and you can experiment with different yarn weights, hook sizes, and even yarn color combinations (maybe even put some cool stripes or color blocking in there)!
Speaking of yarn colors, this bag works up beautifully with solid colors, variegated yarn, or self-striping yarn. It is recommended to use a yarn that does not stretch, such as 100% cotton yarn. If desired, you may add a cloth lining in the bag or to the underside of the straps to add durability.
The Mosu Bag is perfect for kids, adults, teachers, friends, parents, and more! This handy fashion accessory can be a tote bag, a handbag, a purse, clutch, wristlet...you name it. Sell them at craft fairs or make them as gifts for birthdays or holidays. For crochet sellers who want their handmade bags to stand out, packaging them in branded custom mylar bags can protect the items and give customers a polished, professional impression.
If you're looking for some more choices, you can also consider getting some custom tote bags!
PDF pattern available!
The PDF pattern is printable, ad-free, easy to read, includes photo references, and helps support Sweet Softies! (If you enjoy my free patterns, you can consider it as a donation to me when you buy one of my pattern PDFs! It allows me to maintain my blog and continue sharing more free patterns.)

MOSU BAG
Free Crochet Pattern
Terms of Use & Copyright Notice © 2022 Sweet Softies (www.sweetsofties.com). You have permission to sell finished products made from this pattern, but you must credit Sweet Softies as the owner/creator of this pattern by linking to my website (www.sweetsofties.com). No wholesale. You may not translate, copy, alter, or sell my patterns in part or in whole in any way. My patterns may not be used in video tutorials or teaching online classes. My patterns may be used in teaching in-person classes ONLY with written consent from me. You may link to this pattern but you may not copy any part of the pattern instructions on other websites.
Size:
Length (not including handles): 7.75” (20 cm)
Width: 8.75” (22 cm)
Level of Difficulty:
★★☆☆☆ Beginner/Easy. Requires familiarity with stitches used (below) and attaching yarn.
Stitches/Terms Used:
- FO = fasten off
- ch = chain
- sp = space
- sl st = slip stitch
- sc = single crochet
- inc = increase
Materials:
- Non-stretchy (e.g., 100% cotton) medium weight yarn or fine yarn held doubled
Yarn I used: fine #2 Hobbii Twister held doubled
Other recommended yarns: 24/7 Cotton - 5mm crochet hook
- Yarn needle
- Scissors

Notes:
- The bag is worked from bottom-up.
- A full, step-by-step video tutorial is available for this project.
- The printable and ad-free pattern instructions can be downloaded from my store, Ravelry, or Etsy.
BASE OF BAG
Ch 31. (Note: If you want your bag longer or shorter, just make sure you crochet an odd # of chains.)R1: Insert 2 sc in the 2nd ch from the hook. Sc 28. Insert 3 sc in next st, bringing you to the other side of the chain. Sc 29.
Tip: place a stitch marker at the start of each round to keep track of your rounds.
R2: Inc 2, sc 28, inc 3, sc 28. In the last st: inc.
R3: (Sc, inc) x 2, sc 28, (sc, inc) x 3, sc 28. In the last 2 sts: sc, inc.
R4: (Sc 2, inc) x 2, sc 28, (sc 2, inc) x 3, sc 28. In the last 3 sts: sc 2, inc.
R5: (Sc 3, inc) x 2, sc 28, (sc 3, inc) x 3, sc 28. In the last 4 sts: sc 3, inc.
Without FO, continue with the height of the bag.
R6: Sc around.
R7: (Sc, ch, sk a st) around.
R8: Sc on the first sc of the previous round. Ch. (Insert a sc in ch-1 gap, ch) around.
R9: Keep continuing the moss stitch with: (ch, insert a sc in ch-1 gap) around.
R10: Repeat R9 until your bag reaches 20 cm in height when laid flat, measuring from R1. You will want to finish this part with your last st as a sc on one side of the bag.
Without FO, continue with the strap instructions below.
R2: Ch 2, turn. (Sc in ch-1 gap, ch) x 7. Insert your final sc in-between the starting ch-2 and first sc of the previous round. (8 sc total)
R3: Repeat R2 until your strap reaches about 12 cm.
FO with a long tail for sewing.
R1: Ch 2, (sc in ch-1 gap, ch) x 7. Sc in ch-1 gap. (8 sc total in this round)
R2: Ch 2, turn. (Sc in ch-1 gap, ch) x 7. Insert your final sc in-between the starting ch-2 and first sc of the previous round. (8 sc total)
R3: Repeat R2 until your strap measures 30 cm.
FO with a long tail for sewing.
R2: Inc 2, sc 28, inc 3, sc 28. In the last st: inc.
R3: (Sc, inc) x 2, sc 28, (sc, inc) x 3, sc 28. In the last 2 sts: sc, inc.
R4: (Sc 2, inc) x 2, sc 28, (sc 2, inc) x 3, sc 28. In the last 3 sts: sc 2, inc.
R5: (Sc 3, inc) x 2, sc 28, (sc 3, inc) x 3, sc 28. In the last 4 sts: sc 3, inc.
Without FO, continue with the height of the bag.
HEIGHT OF BAG
Note: We’ll work the moss stitch in seamless rounds.R6: Sc around.
R7: (Sc, ch, sk a st) around.
R8: Sc on the first sc of the previous round. Ch. (Insert a sc in ch-1 gap, ch) around.
R9: Keep continuing the moss stitch with: (ch, insert a sc in ch-1 gap) around.
R10: Repeat R9 until your bag reaches 20 cm in height when laid flat, measuring from R1. You will want to finish this part with your last st as a sc on one side of the bag.
Without FO, continue with the strap instructions below.
STRAPS
Note: The straps will be worked in turned rows, not in continuous rounds.Strap #1 (shorter):
R1: Ch 2, turn. (Sc in ch-1 gap, ch) x 7. Sc in ch-1 gap. (8 sc total in this round)R2: Ch 2, turn. (Sc in ch-1 gap, ch) x 7. Insert your final sc in-between the starting ch-2 and first sc of the previous round. (8 sc total)
R3: Repeat R2 until your strap reaches about 12 cm.
FO with a long tail for sewing.
Strap #2 (longer):
First, have the bag set flattened against a flat surface. With Strap#1 on the left side, you’ll want to attach yarn to the very right side of the bag to begin Strap#2. Attach yarn to a sc on the very right edge.R1: Ch 2, (sc in ch-1 gap, ch) x 7. Sc in ch-1 gap. (8 sc total in this round)
R2: Ch 2, turn. (Sc in ch-1 gap, ch) x 7. Insert your final sc in-between the starting ch-2 and first sc of the previous round. (8 sc total)
R3: Repeat R2 until your strap measures 30 cm.
FO with a long tail for sewing.


Sew the ends of the two straps to the other side of the bag. Weave in all ends. If desired, you may add a cloth lining inside the bag to provide more support and durability.
Congratulations on finishing your Mosu Bag!
Thank you for reading, and hope you have a fun time crocheting this project! If you'd like to help out my blog, feel free to check out my post, "5 Ways to Support my Blog!"
You might like my other bag designs if you enjoyed this one! Simply click on the image below for the pattern, or check out all my free patterns here.


I'd love to see your finished work from my designs! Here are links for sharing photos of your creations:
Best wishes,

.jpg)


Hi! How many skeins of the 24/7 cotton yarn would you say you need?
ReplyDeleteHi! I would say to have two skeins to be safe! :)
DeleteI’m making this bag and round 2 of the base is confusing. You have inc 3, should the pattern say inc in next 3 stitches or inc(3 times)? That’s what I had to do to make stitch count work out. I’m now doing the second strap and it looks great. I used a solid and plain yarn held together and it really shows the stitch count. Thanks for the pattern.
ReplyDeleteAll of the instructions are pretty much off. I like the bag, but I had to do some adjusting to get it to look right.
DeleteI meant to say verigated and plain color held together.
ReplyDeleteHow many yards are needed for this pattern? Hobbii yarn is not available here, so I want to purchase enough of whichever substitute yarn I find. Thanks!
ReplyDeletehow many grams needed of 4-ply?
ReplyDeleteThank you for such a beautiful, well designed pattern! Your instructions and video tutorial are flawless! I searched for knot bag patterns & yours by far is the prettiest. I just finished one last night using Lion Brand 24/7 cotton in Cafe Au Lait colorway. Its a perfectly sized bag. The only thing I did differently was to crochet in the BLO on Row 6 to define the bottom a bit more. I may crab stitch the strap edges to create a finish & possibly prevent excess stretch!
ReplyDeleteThis comment has been removed by a blog administrator.
ReplyDelete