


Summer is coming, and so are craft fairs, fun trendy accessories, and quick yarn-scrap makes!
Following the crochet lace headband I designed last month, I decided to branch out into making more accessories, and played around with bracelets. It was so much fun, because I created a no-sew lacy bracelet that is quick and easy to work up... and it uses just a small amount of yarn.
Check it out -- it's an adjustable crochet bracelet!


This Bracelet Design is...
- Quick to work up
- Beginner-friendly
- Lacy and sweet
- Made with only yarn (no metal clasps/closures needed!)
- Able to fit any and all wrist sizes
- During vacations, short weekend rest, or long car rental drives, you will feel much better in stylish outfits.
- Adjustable
- Versatile and can be made with different types of yarn weights, fibers, colors, and crochet hook sizes
- Easily customizable with embellishments (e.g., beads, tassels, buttons, appliques)
- Great for gifting
- Available as a PDF pattern that includes over 36 photo references
- Available as a full video tutorial too!
Easily Customize It!
There are so many ways to customize this fun pattern. You can make it with different yarn colors, weights, hook sizes, and embellishments (e.g., beads, buttons, tassels, appliques, charms) as well!

I'm tempted to make a lucky Chinese bracelet with red embroidery thread and gold beads to symbolize good luck and fortune!
Below you can see the differences in the bracelets that are made from the same pattern, just from using different yarn weights and crochet hooks!

As you can see, the dainty and feminine lacy bracelet made on the left with embroidery thread can work as a lovely fashion accessory for girls and women.
The one on the right, made with medium weight yarn, is a lot bulkier and can be a great unisex bracelet too.
If you want, you can even make a whole bunch of bracelets using yarn scraps and mix-and-match them! It's fun to experiment with the different types of yarn and hook sizes to see what you'll come out with. Here are all three worn together...


Make it for...
These lovely accessories can be made as friendship bracelets, party favors, or thank you gifts. They also make lovely presents for birthdays, Christmas, Mother's Day, Appreciation Days, and other holidays! They can be made in any and all sizes to fit babies, toddlers, kids, children, teens, and adults. Due to their quick-to-work-up nature, you can easily stock up for craft shows and craft fairs by making a bunch of these in one sitting!

If you like this design of mine, you can check out my other Free Crochet Patterns.

You can also PIN it for later on your Crochet board!

Want the PDF pattern?
If you would like to download the beautifully-formatted, ad-free, and easy-to-read PDF version with photo references, you can get a copy from my Ravelry or Etsy shop. Thank you for support Sweet Softies!

Adjustable Bracelet
Free Crochet Pattern
Copyright Notice -- © 2021 Sweet Softies (www.sweetsofties.com). You have permission to sell finished products made from this pattern, but you must credit Sweet Softies as the owner/creator of this pattern by linking to my website (www.sweetsofties.com). No wholesale. You may not translate, copy, alter, or sell my patterns in part or in whole in any way. My patterns may not be used in video tutorials or teaching online classes. My patterns may be used in teaching in-person classes ONLY with written consent from me. You may link to this pattern but you may not copy any part of the pattern instructions on other websites.

Introduction:
The Adjustable Crochet Bracelet is a quick and easy pattern that can be worked up with yarn scraps! It is beginner-friendly, comes with a video tutorial, and clear written instructions. The PDF pattern includes 33 step-by-step photo references to guide you through the bracelet-making process. They feature a lace look with an adjustable clasp, making it possible to make these bracelets with yarn only, rather than having to purchase additional metal clasps and closures. It can be customized with different yarn colors, weights, hook sizes, and embellishments (e.g., beads, buttons, tassels, appliques, charms) as well!
Size:
Adjustable; fits any and all wrist sizes
Level of Difficulty:
★☆☆☆☆ Beginner.
Requires familiarity with stitches used (below).
Stitches/Terms Used:
- FO: fasten off
- Sk: skip
- St: stitch
- Ch: chain
- Sc: single crochet
- Hdc: half double crochet
- Dc: double crochet
Materials:
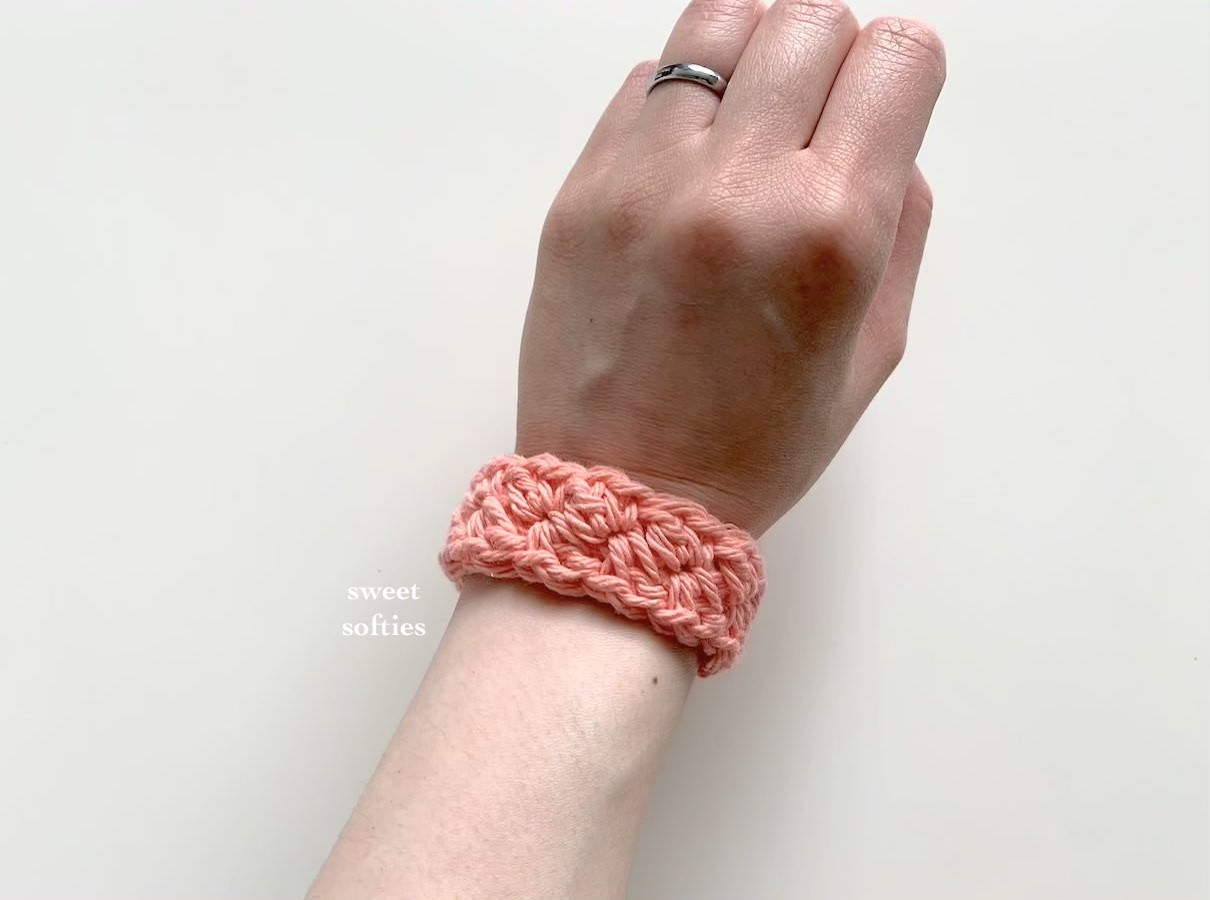
Note: Using different yarn weights and hook sizes will yield different widths for your bracelet. For example, make dainty bracelets using embroidery thread and a small hook, such as a 2.25mm hook.
- Yarn or embroidery thread
- Suitable size crochet hook for the yarn/thread you're using
- Scissors
- Tape
- Clear nail polish
- Beads (optional)

Let's begin!
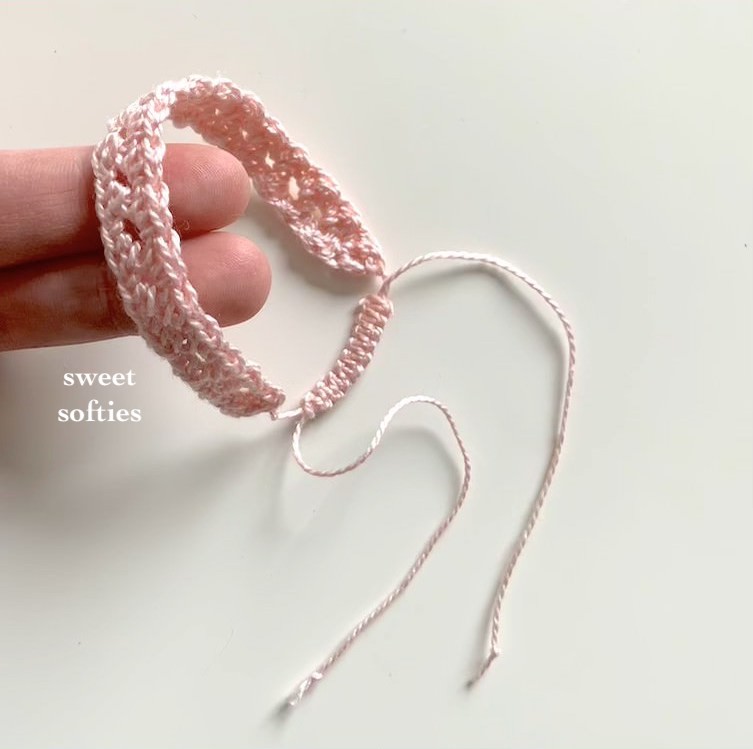
- Start with a long yarn tail. Chain an odd number to the desired length of the bracelet. (Example: I made 27 ch using fine #2 weight yarn and a 3.25mm hook.)
- Ch 1 more, then hdc in 2nd ch from hook. (Sk a st. Sc+dc in the next st) repeat across. Insert a hdc in the last st.
- Turn your piece 180 degrees so that you are now working on the other side of the chain you made in Step 1. Ch 1, then insert a hdc in the first ch. (Sk a st. Sc+dc in the next st, which is a chain gap that has a a sc+dc in the previous step) repeat across. Insert a hdc in the last st.
- Fasten off with a long yarn tail that matches the length of the starting yarn tail.
- End the bracelet using the adjustable clasp method, shown in my video tutorial below. Alternatively, there are many other ways to end an adjustable bracelet. You can check out this "Tie Friendship Bracelets" Article, or this Button Closure / Adjustable Closure video tutorial.

Want to watch the step-by-step video tutorial? Check it out:

There are many ways to customize your bracelet! Here are some ideas:
- String some pretty beads to it before you make the clasp/closure
- Add color tassels
- Put on your favorite charms
- Sew a unique button to it
- Spritz a bit of perfume or your favorite essential oils scent on it (I love to use lavender for a calming effect!)
- Sew a crocheted applique to it
Congratulations on finishing your bracelet!

Want the PDF pattern?
If you would like to download the beautifully-formatted, ad-free, and easy-to-read PDF version with photo references, you can get a copy from my Ravelry or Etsy shop. Thank you for support Sweet Softies!
If you enjoyed this project, you might like my other designs! Simply click on the image below for the pattern, or check out all my free patterns here.


If you made this project and would like to share photos, I'd absolutely love to see! Here are links for sharing your finished creation:
- Sweet Softies Facebook Page
- Sweet Softies Amigurumi & Crochet Community Facebook Group
- Instagram, @SweetSofties
- Email: sweetsofties [at] gmail.com
Best wishes,

.jpg)

.jpg)


