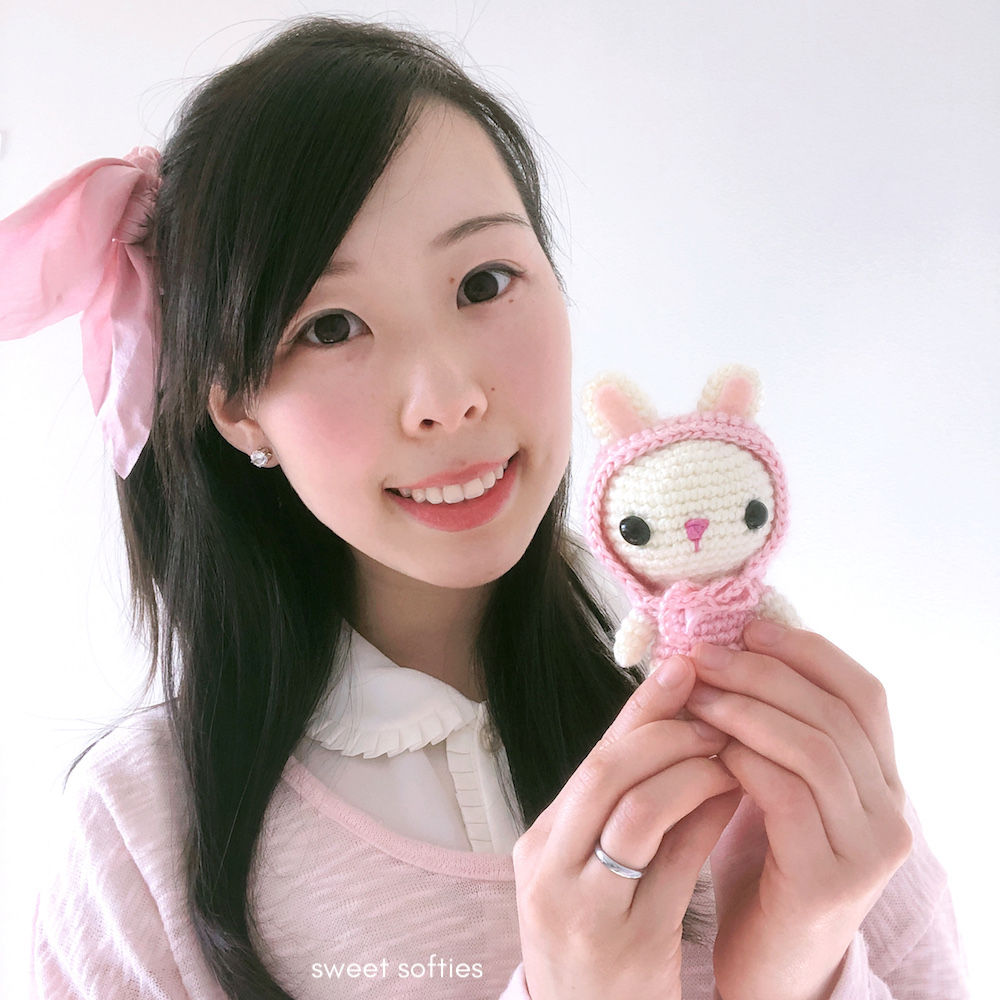


I recently crocheted a bunny lovey for my new baby niece, and would like to share my design! If you're looking for a handmade gift to crochet for a baby or child, this could be a great one!

Scroll down to find the free, written crochet pattern. If you'd like to download the beautifully-formatted and easy-to-read PDF version with photo references (see preview below), both the puppy lovey pattern and the bunny lovey pattern are available to download for a small fee in my shop. Click here to purchase the files.
Scroll down to find the free, written crochet pattern. If you'd like to download the beautifully-formatted and easy-to-read PDF version with photo references (see preview below), both the puppy lovey pattern and the bunny lovey pattern are available to download for a small fee in my shop. Click here to purchase the files.
 |
| Click here for the Puppy Lovey PDF pattern! |
 |
| Click here for the Bunny Lovey PDF pattern! |


Introduction:
The Bunny Lovey Pattern provides instructions for crocheting a sweet, baby security blanket with a lovely bunny rabbit to cuddle. This pattern is very quick to work up, and great as a baby shower gift. Customize your project by using different yarn colors for the bunny or blanket, and add embellishments such as buttons, appliques, or more!
Finished Measurements:
-
Blanket size: approximately 34 cm x 34 cm
Level:
- Beginner! Requires familiarity with the stitches and terms used below.
Stitches/Terms Used (US Terminology):
- MR: magic ring (a.k.a. magic circle, magic loop)
- Ch: chain
- Sc: single crochet
- Dc: double crochet
- Tr: triple crochet
- Sl st: slip stitch
- Inc: increase (two sc in same stitch)
- Dec: decrease (sc two stitches together)
- BLO: back loops only
Materials:
- Worsted medium weight [4] yarn in bunny and blanket colors (I used: off-white, white, light pink, and dark pink)
My favorite medium weight yarns to use are: Caron Simply Soft, Red Heart Soft, Vanna's Choice (Lion Brand), or Lion Brand Heartland) - 2.75 mm hook for the bunny
- 5.00 crochet hook for the blanket (I love Clover Amour hooks!)
- Fiberfill stuffing
- Yarn needle
- Scissors
Before you begin, here are some CUSTOMIZATION IDEAS!
- Use different yarn colors! You can make the blanket one solid shade, two-toned, ombre, or with a rainbow of different colors! Experiment with different color combinations, such as analogous sets or a contrasting one. You can also try different patterns, such as alternating colors for stripes.
- Attach other embellishments, such as flower appliques or buttons.
- Embroider designs onto the blanket or bunny.
~ CROCHET DIRECTIONS ~
PART 1: BUNNY
Note: My entire bunny is crocheted in back loops only (BLO) to create some added texture. You can choose to also work in BLO, or if crochet through both loops. It's up to you and your preference! :)HEAD:
Start with the bunny color (cream).R1: 6 sc in magic ring. (6 sts)
R2: Inc around. (12 sts)
R3: (Sc, inc) x 6. (18 sts)
R4: (Sc 2, inc) x 6. (24 sts)
R5: (Sc 3, inc) x 6. (30 sts)
R6-R10: Sc around. (30 sts)
R11: (Sc 3, dec) x 6. (24 sts)
R12: (Sc 2, dec) x 6. (18 sts)
R13: (Sc, dec) x 6. (12 sts)
R14: Dec around. (6 sts)
Fasten off with a long tail for sewing to the blanket later. Stuff the head while being careful not to stretch the stitches.
EARS (x2):
Start with the bunny color (cream).R1: 6 sc in magic ring. (6 sts)
R2: Inc around. (12 sts)
R3: (Sc 3, inc) x 3. (15 sts)
R4-R8: Sc around. (15 sts)
Fasten off with a long tail for attaching to the head later. No need to stuff the ears.
ARMS (x2):
Start with the bunny color (cream).R1: 6 sc in magic ring. (6 sts)
R2-R10: Sc around. (6 sts)
Fasten off with a long tail for attaching to the body later. Stuff the arms and be careful not to stretch the stitches.
HAIR BOW:
Start with the bow color (dark pink).1. Ch 10.
2. Tr in 5th ch from hook. Tr in next 4 ch. Ch 3, and sl st in last ch.
Fasten off with a long tail and weave it to the middle of the bow. Pinch the middle together and using the yarn tail to wrap around the bow.
PART 2: BLANKET

Start with light pink yarn.
R1: In a magic ring, ch 3 (this is the first dc). Insert 2 dc into the MR. (Ch 1, insert 3 dc into the MR) x 3.
*End of row join: Ch 1, and sl st to join at the top of the ch 3. Sl st in the next 2 sts to come to the next ch-1 space.
R2: Ch 3. In the ch-1 space: insert 2 dc, ch 1, and insert 3 dc. (Ch 1, skip the 3 dc. In the next ch-1 space: insert 3 dc, ch 1, and insert 3 dc) x 3. *End of row join.
R3: Ch 3. In the ch-1 space: insert 2 dc, ch 1, insert 3 dc. (Ch 1, skip the next 3 dc, insert 3 dc into the next ch-1 space. Ch 1. In the corner ch-1 space: insert 3 dc, ch 1, and insert 3 dc) x 3. *End of row join.
Switch to white yarn.
R4: Ch 3. In the ch-1 space: insert 2 dc, ch 1, insert 3 dc. (Ch 1, skip the next 3 dc, and insert 3 dc into the next ch-1 space. Ch 1, skip over the next 3 dc, and insert 3 dc into the next ch-1 space. Ch 1. In the corner ch-1 space: insert 3 dc, ch 1, and insert 3 dc) x 3. *End of row join.
Continue this pattern by increasing the number of 3 dc sts between the corners for each round. I crocheted 12 rounds in total using the following colors:
R1-3: light pink
R4: white
R5-6: dark pink
R7-8: light pink
R9: white
R10-11: dark pink
R12: light pink
R13 (edging): light pink
Edging Directions: Ch 3 and insert a dc in each st around, but insert 3 dc in the four corner ch-1 spaces. When done, fasten off and weave in the ends.
~ FINISHING DIRECTIONS ~
- Using a yarn needle and yarn scraps, sew facial features on the bunny. (I used grey for the eyes, and pink for the nose and mouth.)
- Pinch the bottom of the bunny’s ears to create a fold. Using the yarn tail from the pinched ears, sew them onto the bunny’s head.
- Using the yarn tail from the arms, sew them to the bottom of the bunny’s head.
- Using the yarn tail from the bunny’s head, sew the head to the middle of the blanket.
- Lastly, using the yarn tail from the bow, sew it in front of the bunny’s ear.
That's it, you're done!
Congratulations on finishing the Bunny Lovey Pattern!
I hope you enjoyed crocheting this bunny lovey! Remember to check out the list of "customization ideas" above if you'd like some tips on how to make this project uniquely yours!
Also, if you'd like to download the beautifully-formatted and easy-to-read PDF version with photo references (see preview below), both the puppy lovey pattern and the bunny lovey pattern are available to download for a small fee in my shop. Click here to purchase the files.
|
| Click here for the Puppy Lovey PDF pattern! |
|
| Click here for the Bunny Lovey PDF pattern! |
If you made this project and would like to share photos, I'd absolutely love to see! Here are links for sharing your finished creation:
- Sweet Softies Facebook Page
- Sweet Softies Amigurumi & Crochet Community Facebook Group
- Instagram, @SweetSofties
- Email: sweetsofties [at] gmail.com
- Or, feel free to share in the comments below! :)
As always, you are more than welcome to SHARE this post with any fellow crocheters who'd like to try this pattern! Thank you for reading, and I wish you all a warm and cozy winter season filled with LOTS of love!
Best wishes,

.jpg)


.jpg)